Pages

Friday, November 30, 2012

Penguin bearing a heartfelt gift

One of the things i love about being on a DT is to be able to use awesome images..and Meljen's Designs is pretty cool..i love the collection i have of their images and feel so fortunate to be able to create cards with them...i hope that they will like what i've created!

 From the Card Crafter's Circle blog:

This week Card Crafter's Circle challenge for you is ...

BEARING GIFTS

As we approach the big gift-giving season, we want your creations this week to show gift-giving.. so the gift must be 'present' in the creation! (Bad pun, I know).   this week our challenge for you is to create with gifts and presents in the image or in mind ... I know easy, huh?  


I am using Penguin's Little Letter from Meljens Designs:

 
Card Crafter's Circle challenge this week is sponsored by MelJen's Designs, who continues to delight us with magical images! Our MelJens prize is 4 uncoloured images.  


Copics used:
Body- YR20, Y21, C3, 5, 7
cheeks- R14, 20
beak- YR12, 07
hat/stripe/heart- R35, 37, 39
green stripe- YG03, 17, 67
pink stripe- R81, 85
blue stripe- B00, 02
envelope- BG10, 11

The sketch i used is from Tuesday Morning Sketches.. (told you i'd use this all week long) :o)
 

Thursday, November 29, 2012

Candy Cane Jingles and Warm Wishes!

I think my favorite images are vintage and cute...always cute and now i also like vintage and cute so this image is perfect! 
Today i am sharing this card i made for Digital Delights and i used Candy Cane Jingles and Warm Wishes Sentiment from the Snowie Collection:
I am using the same sketch all week..it's kind of cool as it looks different depending on the paper and the image, i think.  The sketch is from Tuesday Morning Sketches:

Copics used:
snowman-C0, 01, CB, Stickles/diamond
cheeks- R14, 20
candy cane- C1, 3, R35, 39
boots/hat band/stripe- BG10, 11, 13
scarf/holly- G21, 57
button- E59
hat- C3, 5, 7

Tuesday, November 27, 2012

Berry Nice Candy Cane Christmas Critter

That was a mouth full!  Actually, I combined the title of two super cute rubber stamps..yes, you read right, these are rubber stamps!

This week at Tuesday Morning Sketches, we have a sponsor called DRS and i am using two of their stamps to create this card... Again we have a super fun sketch...in fact i am using this sketch for all of the cards i am doing this week.

Here is my card using DRS Berry Wreath and Candy Cane Christmas Critter.


The sponsor at Tuesday Morning Sketches is DRS.
  DRS Designs

This is the sketch for you to try at Tuesday Morning Sketches (I rotated it on it's side):

Copics used:
mouse- R14, 20, W1, 3, 5
wreath- E41, R35

Let's Celebrate..the Holidays!

How cute is this image??? i did cut off the sparklers...i thought it looked like the 4th of July and i wanted them for this card and season.  I will post the original digi so that if you want to make this card you will know what you are looking for... SOOO Cute...

The challenge at {Pin}spirational challenges is a cute picture of a dog with these large glasses on..and i thought that the sponsor, 2 Cute Ink had the best image using this owl digi.

I also used Glossy Accents by Inkessentials to get the "glass" look  for his glasses. I used a bit of Extreme glitter paint on his scarf.  The ribbon is from a MS pack.  The Holiday Wishes is a bargain..stickers for sealing envelopes at Target!

This is the {Pin}spirational challenge photo..you can use the dog image, the color of the photo..pretty much anything to participate and win great prizes from our sponsor, 2 Cute Ink.
  Picture
 
All this week i am using a sketch from Tuesday Morning that starts today!  Check it out!

Copics used:
Owl- E41, 42, 43, 44
cheeks & ears- R20
glasses- BG11, R35, 39
beak/feet/stars- YR12
scarf- G21, YG25, G28

Joyful Blue Skies

One of the things i didn't know i didn't like when i grew up in MI is the gray skies in the winter.  I remember when we would make a trip to the south for Christmas break (happened maybe 2 times when i was at home) my mom would say.."Look at the blue skies!", and sure enough we would get to Kentucky from MI and there was blue skies!  Winter would be much more en"joy"able with blue skies.  Inside sentiment, Wishing you Joy this Christmas.

The theme at Twist of Faith for you this week is 
BLUE SKIES ... USE BLUE!

This is a colour challenge, so we want to see lots of blue ... maybe you'll create a monochromatic card... it doesn't matter, as long as BLUE  is your main colour!  Remember our 'twist of faith' your creation should also include a scripture, or quote or an uplifiting sentiment that suits this week's theme.

Here is my card using Raggedy girl gingerbread joy image from Stamp Art By Katheryne:


We welcome  StampArt Design by Kathryne! Our random prize winner will receive their choice of 
4 images from the SADK collection available at Whimsy Stamps ... wonderful! We're thrilled to have  StampArt Design by Kathryne as a sponsor because we love the images and sentiments!

The sketch i used is from Tuesday Morning Sketches:
 
Copics used:
skin- YR000, 00, R14, 20
hair- E97,  99, 09
hat- R35, 37, 39
fur- C1, CB
joy- B02, 04, 06
gingerbread man- E42, 43, 44


Sunday, November 25, 2012

Brrrr...it's a Winter Bliss

Okay, you know sometimes creating styles are "out of the box"...i am not talking new technque..but a style you know is "not" your style..well the challenge this week at Stamptacular Sunday is SO not my style..i love the style..just not what i do well...and i am not fishing for compliments..just stating a fact.


This week’s challenge at Stamptacular Sunday is going to be so much fun!  We can’t wait to see what you create!
This week's challenge is a…
“Winter Bliss!”
For this weeks challenge you will create a card or project that has a WINTER SCENE!  You can use a single stamp that is a winter scene BUT…if you create a winter scene all on your own your name will be entered into our drawing THREE times!  Please be sure to let us know in your post if the scene created in your masterpiece was an original by you or if it was a stamped image!
Here is my card for the Winter Bliss using Tilda with Snowman, Tilda's Birds and DJ Inker's Fir tree:
 Please join us at Stamptacular Sunday Challenge Blog to see the amazing DT creations!
 
You will have from now until midnight (EST) December 1st, 2012 to complete this challenge and post a DIRECT LINK to your submission into our InLinkz in order to be entered into the drawing for this week's fabulous prize donated by:
PRIZE:  Winner's Choice of 2 Digis!
I have also used some wired eyelash tinsel/trim from Michaels.
Copics used:
skin- YR000, 00, R14, 20
hair/broom- YR21, 23
coat- R81, 83, 85
jeeans/ snowman's hat/mittens- B91, 93, 95
shoes/ broom handle- E25/ 29
snowman- C1, CB
birds- R24, 35, 37, 39
pine trees- stamped w/American Craft markers, colored w/G20, 21, 24, 67


Friday, November 23, 2012

"Snow" Thankful!

This week at Card Crafter's Circle i got to play with a new image from Milk Coffee and he is a cutie!!


Card Crafter's Circle challenge for you this week, is to create following our theme

GIVING THANKS

Your creation could be about the holiday Thanksgiving, or could be a Thank You for another reason... we don't mind, as long as you're giving thanks!

Here is what i made using Doodle Snowman from Milk Coffee


 We are so happy to have Milk Coffee Stamps joining us again with sponsorship for you!  The winner's prize purse is their choice of 3 Milk Coffee images of their choice! Yummy!
And our super sponsor also provides each of our Top 3 with an image of their choice too! Yay!
Feast your eyes on these Milk Coffee creations by our design team!

I also used a sketch from Tuesday Morning Sketches from this week's challenge..and guess what? I designed it. :)

Copics used:
cheeks- R14, 20
nose- YR12, 07
hat- W1, 3, 5, 7
hat band/scarf- R35, 39
stripe/buttons- YG06, 07
stick hands- E57
snowman- C0, 01, CB

Thursday, November 22, 2012

There's No Place like "Gnome" for Christmas!

I know i've said over and over, that my youngest daughter love Woodland anything and has loved gnomes for a long time..SO, i  had to make this one from Digital Delights..YAY!

Not only do i have a Gnome, but i have his house too..and it's sparkly just like my daughter likes it. :)

Here is my card using Mr. Gnome and Mr. Gnome's House...can you tell i am smiling as i write this..i am.. (the value set is also available here)
I found this awesome moss trim..it comes in rolls and i added it to this card and to make sure it didn't have loose pieces falling off i used the Matte Gloss from Inkessentials to keep it together..  My daughter doesn't normally look at my blog, but i will be sending her a link..i want to know what she thinks.

Copics used are:
Gnome
skin/cheeks-YR000, 00, R14, 20
nose- R14, 37
hat- YG25, 95
hat rim/shoes- YG95, 99
coat- E43, 44
belt-E97
Liquid Applique for beard and white spots on mushroom, but i didn't activate it with heat..i like the glossy look

Mushroom house- E41, 42, 43
door- E43, 44, 79
underneath the mushroom cap- E41. 42. 43, 44, 79
windows- R37, 39, BG11
mushroom cap/roof- R35, 37, 39
chimney- YG95, 99, CB

My teammates cards are here at the Digital Delights blog...please check them out!

Wednesday, November 21, 2012

Vintage Angel Kisses

Just need to say..that ALL of the dies "featured" in my Dutch Paper Crafts posts are available for purchase at Dutch Paper Crafts..HERE.

I was going to say this was my Dutch Paper Crafts grand finale..like the fireworks, because i used 3
of the 6 dies that i received..but eh..it's not the finale..i have one more to share, but the last one isn't the grand finale..just the last project.

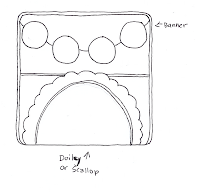
I came across this type of card construction on another blog and i will share the link below so you can check out her instructions...my card isn't anything like hers, but she has really good instructions.

So for this card the featured dies are, Memory Box Frostyville Wreath #98418 (sparkly antique gold), Flowering Winterberry #98391(cream glitter paper w/red glitter circles) and The Leaping Deer #98390.

Memory Box Die  FROSTYVILLE WREATHMemory Box Dies, Leaping Deer
Memory Box Dies, Flowering Winterberry


Again, i'd like to make a comment about the Flowering Winterberry die.  It comes with two tiny pieces..one is the circles and the other is the leaves...so please make sure once you open them you put them in a secure place so you won't loose them.

I also want to say why i LOVE Memory Box dies...they are so intricate. Something that my Cricut really couldn't attempt to do without ripping them to shreds.  The details are just beautiful!


Other items i used not in this release are:
Spellbinders classic circles,  Spellbinders Blossom Tags and Accents (love this set) #9201427
Rubber Stamp used is from Stampendous and is called Angel Kisses.

Blossom Tags And Accent Die Template - Shapeabilities - Spellbinders

Copics used:
skin- YR000, 00 R14, 20
hair- Y21 (blonde), E25 (brunette)
pink coat- R81, 83, 85
blue coat- B91, 93, 95
lamp- E97, R14, YG03
wings- YR20, 21
shading- C1, Stickles diamond and frosted lace


The site i got this idea from is called Paperfections and her tutorial as well is here.


Starry Starry Night

This is the first thing i crafted once i got my dies from Dutch Paper Crafts.  I just knew i wanted to create this star using white pine trees.  I was so inspired by a book called Delight in the Seasons by Lisa Pace.  I put my twist on this idea and came up with my own double star ornament.

This is what i made with the featured release die from Memory Box called, The Leaping Deer ##98390.

Memory Box Dies, Leaping Deer 

Some other supplies i used not in the release is:
Spellbinders Classic Circles, Metal silver beads, wired silver garland from Hobby Lobby (large star) Tim Holtz "non-wired" garland (small star), Kaiser heart gem.  Wire from the floral dept. Chipboard sentiment was a freebie from a UK magazine.  Gold paper was from Hobby Lobby.


Some sample pictures putting this together...just let me say, fake snow makes a mess! LOL
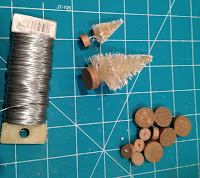
Okay, so here are the basic supplies.  I unscrewed/pulled the wooden bases off of the white trees, that allowed me to have "some" wire to twist the trees together. I  strung the wire from the small star into the center of the large star.  Of course, i can't waste the wood pieces so after i used the floral wire, i attached the wooden bases to the center of the stars..it also made it easier to attach the paper circles..as it would not adhere well to the trees.  I used hot glue to adhere the wooden circles to the centers of the stars. I also put the wooden circles on the front and back of the stars. Also i used the small wooden circles for the small trees and the large wooden circles for the larger star.  I hot glued the metal beads to the ends of the large star, i did not add any to the small stars.  After die cutting the circles i used hot glue to add the tinsel garland.   Then i finished it off with the diecut deer, i also added a shadow to the deer by cutting another piece to put behind the gold deer.


Partridge in a pear (tree)

Another project for Dutch Paper Crafts..and in as much as it IS my version of a Partridge in a Pear tree, it isn't a partridge and it's not a tree. LOL

What it IS, is two featured dies called Memory Box Classic Pear #98392 and Embellished Pear #98393 and i chose to make an ornament with this set.  I've seen tons of things that can be made, but chose this for now...

Memory Box Dies, Embellished Pear
Memory Box Dies, Classic Pear Just a note..the pear stem and leaf are fairly small, i would put them in a secure spot so you won't loose them.
For my project i didn't use the stem, i actually went out in my yard and found a twig and i think it actually looks like a pear stem.  The leaf is cut from felt, the felt was thick so it took several times to run through my Cuttlebug.  I was impressed that it actually embossed into the felt as well...don't know if it will be lasting.


Other items used in this project is a digital image from Doodle Garden on Etsy called Winter Bird 1, i actually flipped it horizontally to fit on my die.
I also found the pear writing/shape (a bit different shape than the die, but close enough..and it's a freebie found at Scraps of Color Espire "The perfect pear".   When i printed my pear freebie, i changed the color to sepia instead of using standard black ink.

Copics used:
bird- R14, 20, E41, 43
wing- YG01, 03, 93. 95
scarf- G21, R14
pine- YG25
feathers- YR21
beak-YR12
snowflake- C1, stickles/diamond
branch- E25


Some photos of constructing this project:
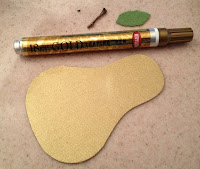
I cut the pear out of a thin corrugated cardboard and ran the gold and lettered paper through my large Xyron..I used a gold leaf pen to color the edges of the cardboard pear..don't know if it was really necessary.  then i adhered the pear die cuts to the cardboard base..i cut the embellished pear die out of a off white glitter paper and a brown glitter paper and used my glue pen to adhere them.  I hot glued the stem and leaf to the gold side and added a bow to cover it.  i also had some pearl buds and glued them behind the bow as well.  I strung up some jingle bells and also glued the string behind the bow.  I colored and cut out the Winter Bird digital image.


The Wonder of Christmas

Here is yet another release for Dutch Paper Crafts, I found this awesome book with a spring wreath and i thought why not use this concept for Christmas?

Here is my project using the featured release Memory Box Frostyville Wreath #98418: inside of wreath (red)

Memory Box Die  FROSTYVILLE WREATH 


Other items used for this project:
Any square measuring about 1.5" for the green"curled" paper.  I would recommend using the Spellbinders Fleur Dis Le square S4-318.

Memory Box  Locina Buckle 98184 (cream glitter paper- cut in half)
I also used the standard Spellbinders Classic Circles to cut the base (largest circle), and then i made another gold band using the circles (found under the Frostyville wreath)
Memory Box Dies, Locina Buckle 


Digital image used is from Mo's Digital Pencil and is called,  Santa's Hat.
Copics used:
skin- YR000, 00, R14, 20
hair- E25
eyes- BG13
hat- R35, 37, 39, YR20, CB stickles
outfit- G20, 21, 24
cookie- YR21, C1, CB
plate- YR23, 24


Some pictures constructing this project:
I used a cereal box for my "chipboard" base..i cut out two and glued them together.  I cut out two paper circles one for the front and back to cover the chipboard.  Then i started to curl the 1.5" squares and secured them with hot glue. After i made enough of the rolled green squares, i again hot glued them around the base.  Next i used jewelry head pins and threaded the three different sized pearl beads on..to secure them from not falling off, i hot glued the first and last bead to the pin.  Nest i just glued the pearl head pins inside each of the curled squares.  I cut out the dies and added them.  This shows that anything can go in the center.  You don't have to use a digital image.


Celebrating the birth of Jesus

Good news..I am on a new design team called Dutch Paper Crafts..it is an awesome store...one stop shopping for anyone loving dies...

I was so excited to get this set of dies, what will be called a "release" on the blog and i will be sharing all of the projects individually.

Up first is my card featuring from this release Memory Box - Starry Wreath #98403:


Additional items used:
Spellbinders Fleur Dis Le Square S4-318 (green on my card, i also folded the corners behind the base)
Memory Box - Elegant Scrollwork 98153
Elegant Scrollwork Die, Memory Box


Corner IT KITS #DG0290 by Lifestyle Crafts(used bottom left corner and cut it apart...cuts beautifully!)

Digital image used is from Mo's Digital Pencil called "In the Manger"
Copics used:
skin-YR000, 00, R14, 20
hair- E41, 43, 44
swaddling- E81, 53
manger- E71, 74, 79
hay- Y11, 21, YR23
wings- BV000, 00, 01