Pages

Wednesday, May 31, 2023

Alicia Bel - Maleficent

Say something interesting


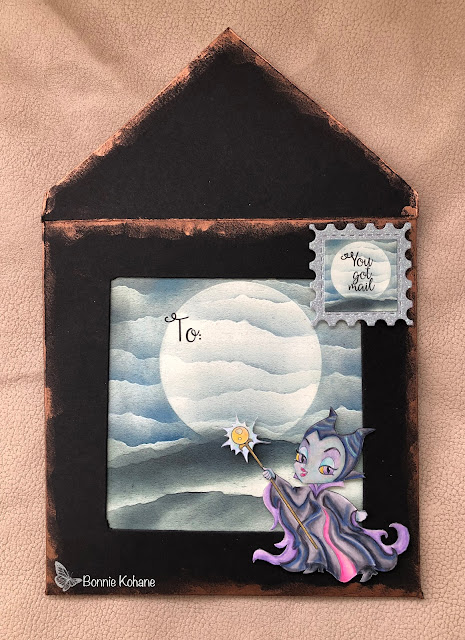
For this card, i decided to enter Alicia Bel's May challenge which is to alter an envelope.
I chose to use Alicia Bel's Maleficent. I colored her with Prismacolor pencils and a gold gel pen and fussy cut her out.
I cut out an envelope and cut out the center to add the We Are 3 Digital Paper.  I added the gold wax along the side of the envelope.  The sentiments will be in a new We Are 3 Digital Sentiment set. 
I also created the "postage stamp" by reducing the paper and adding a sentiment and die cutting the paper to fit on top postage stamp die with in the stitched lines.

I would love for you to visit We Are 3 Digital Shop Facebook group and share your cards/projects created with We Are 3 Digital Shop paper/images and sentiments.  
Visit us by clicking here!

Click here for the We Are 3 Etsy Store link


Tutti Designs - Happy Birthday Windows

Hello!  Let's see what you can create with Tutti Designs today!


For this card, i started with Fairy Hugs Craft Papers - WaterShine.  As usual, i try to save on paper so, i die cut Tutti Designs - Stitched Postage largest die from the center of the first paper layer.  
I set that aside. 
Next layer is a white card stock and to get the lines i just scored it in my score tool.
Now for the stitched postage die cut.  To get the window/frame from the Stitched Postage, I die cut Tutti Designs - Happy Birthday Window from the center of the postage die cut. (i don't need the Happy Birthday colorful die cut for this card, so i saved it) Next i cut out the Happy Birthday Window from white card stock and set that aside.  Using the outside die from the Happy Birthday Window, i cut out a piece of matching purple to place behind the white Happy Birthday Window die cut, i centered it on the purple paper and adhered the die to the purple paper. 
I cut out a square from the same white card stock, and to make a frame as shown, i cut another square a bit smaller but large enough to frame out the opening in the stitched postage stamp die cut as shown. I adhered the white frame.  
Next i added double sided foam tape to the back of the postage stamp "frame" and figured out where the Happy Birthday Window w/purple backing needed to be placed so that i fits in the postage stamp frame.  Once that was figured out, i adhered the Happy Birthday Window to the white layer and then added the postage stamp frame on top of it.  And that's it.


I have used:


Be sure to visit Tutti Designs
for LOTS more fabulous dies and
come back again for more Tutti Designs inspiration!

Here are some Tutti Designs quick links:


Tuesday, May 30, 2023

DiesRUS - Lisa Horton 3D Embossing Folders, Torn Aperture and Layered Petals

Hello everyone!! 

Remember the Special Order offer from DiesRUs?
This is what i made using 2 Lisa Horton's 3D Embossing folders that i purchased!!


This is my second attempt at using Lisa Horton's 3D folders.
I have to say, i really like them.
Both of these embossing folders do not come with a stencil, so the first thing i did was use the Torn Aperture.  This folder measures about 5.5 long and 4.25 wide.  If you use it on a larger paper it can't be centered.. unless you don't care where the opening is.  Also, the edges of the folder emboss a line if you use a larger paper.  so i went with a paper that fit inside of the folder.  This folder also comes with a die for the opening.  It does make a difference where you die cut this opening as the paper needs to fit back in and line up with the embossed design. 
So, you can lightly press the folder to get an imprint of the opening.  And then die cut.  (i eyed it).
 I didn't want the raised part of the torn aperture to have a color, but i did want the background to have a color, so i inked up the embossing folder, on the debossed side using Distress Oxide - Gathered Twigs and ran that through my die cutting machine. When it came out i chose to add more ink to the paper and i misted a bit of water to the paper to get a distressed look. To finish off the aperture, i decided to offset a brown mat and die cut the opening.  Adhere the aperture to the brown mat and cut the sides to the right width.  Add double-sided foam tape to the back (i added 3 layers because my foam tape was thin).

Now for the second 3D embossing folder called Layered Petals.  This is a 6 x 6 folder. 
I embossed 2 cream papers.  One for the background behind the aperture window.  I fussy chose the part of the embossing flowers i wanted to show through the window and then I trimmed that down to fit behind the window.   You can now adhere the window to the embossed flowers background. I set that aside until i layered everything together on the card.
For the second cream paper, i embossed, i colored the flowers and stems with Prismacolor pencils. I decided to ink up the background on this folder as well.  Using the debossed side i ran VersaFine Clair - Fallen Leaves over the background.   It also inked some of the petal and leaf veins.  Do not press hard as you will get more ink in the debossed part.  Just light press the ink.  Next, i repositioned the colored pencil embossed paper back into the inked folder, it can line up perfectly, but it works fine to get it as close as possible.. that is the result you see on my card..not perfect. 
Now i chose to fussy cut the flowers leaving an edge to high light the pink/green.  Here is how you can "fix" any of the the not perfect embossing.  I had some white areas showing.. so i pulled out my Distress Oxide and blending brush and inked the flowers, leaves and stems slightly.
Before i add my flowers, i matted the aperture with rose gold metallic paper.  I distressed the edges of the metallic paper first.  Now i added the matted aperture to the cream card base.

Now for the fun part.. i fussy cut the flowers i wanted to use for the arrangement. i arranged the flowers around the aperture.  None of the flowers went inside, but that could work.  If you look at the embossing folder and my flowers you can see which ones i fussy cut too.  I attached the flowers with glue and foam tape.

This would be great with a sentiment too.  I just didn't have a Lisa Horton one. 

DiesRUs Store Supplies:
Lisa Horton - 3D Embossing Folder - Torn Aperture

Lisa Horton - 3D Embossing Folder - Layered Petals


Store ** Facebook** Instagram ** YouTube ** Pinterest

Like us on Facebook
Follow us on Instagram: DiesRUs

Last Minute Manda - Stuffed With Love - Giraffe

 I have something to share with you today from Last Minute Manda!

I also have a special Last Minute Manda discount for you 
when you shop please use: 
Bonnie25


For this first part of this month i will be working with Last Minute Manda - Stuffed with Love
Today i am using the giraffe!!

     Just wanted to say that i used the PNG format for the images and printed, colored and fussy cut the lion using this digital paper:


I am also using:


Last Minute Manda - Digital Store

Last Minute Manda - Clip art store

Last Minute Manda - Facebook Group


Monday, May 29, 2023

Fairy Hugs - Fairy Tales- Castle Tower

Hello everyone!! 

Let's see what we can make using Fairy Hugs Store supplies! 

Fairy Hugs - Castle Tower

Like us on Facebook
Follow us on Instagram: Fairy Hugs Store
 Join our Fairy Hugs Facebook Group here

 Don't forget to include #FairyHugstore on your projects and tag us at @FairyHugStore so we can be sure to see and comment on your projects!

Sign up to receive Fairy Hugs Newsletters at the Fairy Hugs store.

 
Thanks for stopping by!

Friday, May 26, 2023

Tutti Designs - Bird Tapestry and Stitched Postage

Hello!  Let's see what you can create with Tutti Designs today!


For this card, i saved the negative parts of the birds (and the tiny hearts and stars) from Tutti Designs - Bird Tapestry to create this card.  If you remember, earlier on my blog i shared the card i made with the Bird Tapestry die. 
So this is like a two for one card.
*Tip i don't adhere the layers until i have everything cut out an positioned.
Let's start with the base, i used We Are 3 Digital Paper - Painted Canvas (purple paper with brown hill).  I actually cropped the mentioned paper to just get the sky. I then enlarged the paper size to 5.75 square.

Next, to save on paper, i cut out a purple square that would mat the largest Tutti Designs - Stitched Postage die from the purple digital paper, knowing the cut out square would be covered with the layers on top of it.
The Stitched Postage die is cut from cream card stock.
Before you adhere the second purple mat, i cut out 2 squares for the the background of the smaller postage stamp dies.

Now i did the same thing for the next matted layer (cream, yellow, purple) from We Are 3 Digital Paper - Backgrounds Happen.  I made that layer large enough to cover the cut out square from the first purple layer. So if you look you can see that there is a layer on top of the large stitched postage die.  That was cut from the cream, yellow purple layer.  *tip - You do not have to cut out the squares to save on paper, because you are using digital paper you can just print the sizes you need. 

Next, i cut out 4 second to smallest postage die from cream card stock. You will need to make two bird decorated squares and 2 floral type squares.  For the bird squares, i used the 2 saved purple squares and put those on top of the cream postage dies.  Looking at the die i placed the bird (negative pieces) on top of the purple square. For the floral doily looking squares,  I die cut just enough of the Tutti Designs - Floral Heart Frame of white card stock to make 2 squares.  I glued that piece onto cream card stock and die cut them from squares that would fit inside of the postage square stitched lines. 
Now, i start to adhered each layer. The first two layers are adhered with tape.  The large postage die is adhered with double sided foam tape.  The bird postage is adhered with double sided foam tape. Where as the floral doily squares are just glued down.

Bird fall out pieces were cut from We Are 3 Digital Paper - Summer Splashes

I have used:


Be sure to visit Tutti Designs
for LOTS more fabulous dies and
come back again for more Tutti Designs inspiration!

Here are some Tutti Designs quick links:

Also used:


Thursday, May 25, 2023

Last Minute Manda - Stuffed with Love - Bunny

 I have something to share with you today from Last Minute Manda!

I also have a special Last Minute Manda discount for you 
when you shop please use: 
Bonnie25


For this first part of this month i will be working with Last Minute Manda - Stuffed with Love
Today i am using the bunny!!

        Just wanted to say that i used the PNG format for the images and printed, colored and fussy cut the lion using this digital paper:


I am also using:


Last Minute Manda - Digital Store

Last Minute Manda - Clip art store

Last Minute Manda - Facebook Group


Fairy Hugs - Pumpkin Carriage

Happy Thursday!

Playing catch up today!!

Let's see what we can make using supplies from Fairy Hugs Store 

I am using Fairy Hugs - Pumpkin Carriage

For this card,  I started with Fairy Hugs Craft Papers - Lotus Wish. Before i started stamping, i decided i wanted to heat emboss the Starry Walkway, so i had to stamp it first so that nothing else i stamped would have the embossing powder on it.  I did stamp the Starry Walkway twice and used VersaFine Clair - Nocturne. The embossing powder i used is Ranger Glitter Turquoise. I stamped the rest of the stamps as shown. I used VersaFine Clair - Nocturne on everything but the Castle Tower.  For the Castle Tower i used, VersaFine Clair - Morning Mist.  For the Enchanted Branch i wanted it to extend across the card, so i stamped it twice and used a Copic Liner pen to fill in the gaps. I colored in  the castle, carriage and fairy with Prismacolor pencils.  I wanted the carriage to have a two tone look, so the bottom is a pumpkin color with a blue at the top.  I used a gold glitter pen to highlight everything too. 

Fairy Hugs Store Supplies:


Like us on Facebook
Follow us on Instagram: Fairy Hugs Store
 Join our Fairy Hugs Facebook Group here
 Don't forget to include #FairyHugsStore on your projects and tag us at @FairyHugstore so we can be sure to see and comment on your projects!

Sign up to receive Fairy Hugs Newsletters at the Fairy Hugs store.

Fairy Hugs Retailers:
 
Thanks for stopping by!