Pages

Showing posts with label 3-D decoupage. Show all posts

Friday, April 11, 2014

My Besties Big Head Freckle Girl w/bow

I know i am crazy..i am really liking this technique of enlarging digi images and cropping them...  I can't do that to all images, they have to be just right to make it work.

I thought i would take this image to another level and paper pieced the bow and raised it like 3D decoupage.

So here is my card using Image 221:
I rotated her in Photoshop and then cropped her.  I also shaded the paper pieced bow w/copics.

Another view showing the dimension:


Copics used:
skin- YR000, 00, E02
hair- E71, 74, 77, 79
eye- BG11, 13
shading on bow- W5, 7 , CB

Challenges:
Stitch N Stash- Sketch  New stash is the yellow flowers..old stash is the butterfly punches/and the paper i used.
Fairy Tale challenges- Butterfly
Outlawz- Alcohol markers/ Keep Calm and Craft On
As You Like it Challenge- Stitching Faux or Real (i prefer real..i just like sewing it's my favorite craft)..I hope you can see my stitching..i made two lines..around the brown outer layer and on the inside yellow layer..and i used pink thread :)
Crafty Little Fairies Challenge- Button up
Scrapbook Stamp Society Challenge- Anything Goes

Sunday, March 16, 2014

My Besties 3D decoupage Baby Girl and Boy Moon Box in a card tutorial

I am so very honored to be Guest Designing for!  My Besties Norway challenge blog!  Please go here to join in the challenge!

For this challenge they would like you to use the challenge theme, "Congratulations".  I've chosen to use the 3D sheet Baby Girl w/moon and then i colored up the Baby Boy moon image #754 and turned him into a 3D image as well. Sentiment stamp is from Lili of the Valley.

Here are both of them pictured together:
A few more views,


Copics used for the Baby Boy with moon (Baby girl was pre-colored)
skin- YR000, 00, E02
outfit- BG000, B91, 93, C0, CB
eyes- B02
dog slippers- E53, 55
basketball- E97, 07
moon- Y11, 15, RV23
stars- G20, 21, BG11

Tutorial for layering the Baby Girl w/moon and how i constructed the card in a box (click on the images to read them better):
Make sure you go here to this link to get your box measurements. 

I made mine with out a front flap.


Challenges:
A Creative Romance- Seeing Double
Sugar Creek Hollow Challenges- Photo Inspiration
Sentimental Sundays- Cute and Cuddly
Besties Challenge- Baby and Kids Cards
My Besties Germany- Anything Goes


Thursday, March 13, 2014

My Besties 3D Decoupage featuring the Mermaid

This week at My Besties 3-D Deco Challenge blog we have another great challenge for you!

The theme is to use a Fancy Fold on your 3-D My Besties card/project. 

To participate in our challenges go here:

All we ask is that your My-Bestie Image has 3 or more layers, making it raised up from the surface of your Card/Project and to follow the challenge theme.

Some more info about the My Besties 3-D sheets available for you to use:
These sheets are fun and easy to use!  They are all pre-colored for you, all you do is print out your sheets, cut out the pieces you wish to use and layer them with foam tape, foam dots/squares or Silicone glue. 

For this project i am using Mermaid found at the My Besties store here.  I combined two different Fancy Folds to make one.  I used the Upright "Z" fold and an Easel card.
side view, the large pink striped star on the upper right and the small pink star on the upper left hold the top of the card for the "Z" fold:
The card unfolded and laying "flat" so you can see the construction:
To make it an easel card, i added a flap under the "Z" fold.

To find the Decoupage sheets in the My Besties Etsy store click here.

 Dies i used:
The doily die around the image is from Marianne dies, the bubbles and the delicate bow in the corner  and the curly waves are from Memory Box.  The stars holding the card and the mat around the gem are from Nellie Snellen.  I do not recall where the side star border is from..the die is black metal...don't know if that helps?

You should also check out my 3-D Deco team mates awesome designs..the links are below:

Julie Team Leader
Angela
Miranda
Deidre
Bonnie (me)

Challenges:
Cute Card Thursday- Girls, Girls, Girls
Little Red Wagon- Truly Dimensional
Top Tip Tuesday- 3 border die cuts (bubbles, bow, star), 5 different designer papers,  7 stars

Thursday, February 27, 2014

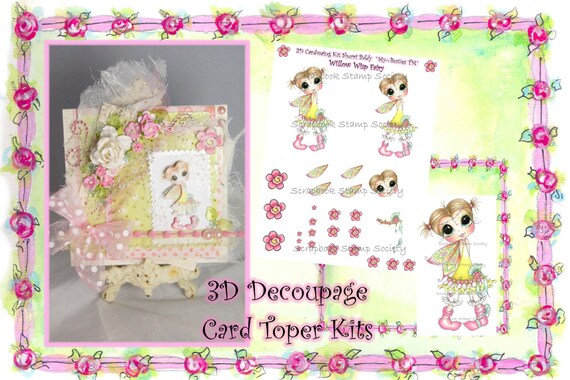
My Besties 3-D Deco Decoupage Challenge - Willow Wisp Fairy

This week at My Besties 3-D Deco Challenge blog we have another great challenge for you!

The theme is to add Flowers and Lace to your 3-D My Besties card/project. 

To participate in our challenges:

All we ask is that your My-Bestie Image has 3 or more layers, making it raised up from the surface of your Card/Project and to follow the challenge theme.

Some more info about the My Besties 3-D sheets available for you to use:

These sheets are fun and easy to use!  They are all pre-colored for you, all you do is print out your sheets, cut out the pieces you wish to use and layer them with foam tape, foam dots/squares or Silicone glue. 

This week i decided to share a project/album with you.  I've had this die i've been wanting to use and without the coloring i had a lot more time to put this together, plus the die was easy to use.   
For this project i am using Willow Wisp Fairy found here.

more views..i used the designer paper sheets for the framing of the accordion mini album, the accordion badge was also designer paper from the 3-D "sheets".  This is the side view:
Here is the closed album:

You are going to love playing with these Decoupage sheets..click here for the link.
INSTANT DOWNLOAD Digital Digi Stamps Willow Wisp Fairy 3D Decoupage kit Besties Big Head Dolls Digi By Sherri Baldy

 Dies i used:
Memory Box badge die, Noor/Joy Crafts Butterfly border, Tattered Lace pink frame, Go Kreate green frame, Sizzix Accordion album die.


You should also check out my 3-D Deco team mates awesome designs..the links are below:

Julie Team Leader
Angela
Miranda
Deidre
Bonnie (me)

Challenges:
Quirky Crafts Challenge- Layer it up/3D
Decorate to Celebrate- 3D flowers or Birthday (this is a pop up birthday album w/3D flowers for displaying)
Little Red Wagon- Spring


Thursday, February 13, 2014

My Besties 3-D Deco (Decoupage) challenge with Sweet Rose Bud!

A brand new challenge has started at My Besties today, it is called My Besties 3-D Deco and you can find it by clicking here or the name of the challenge blog.

The challenge starts today and goes for 2 wks. The challenge is on Australia time so make sure you check when it ends.

The challenge them is Hearts and you must use a My Besties image.  You can use the new decoupage sheets or you can make your own My Besties that you already own into a 3-D decoupage image.

Do you know what 3-D decoupage is?  There are several YouTube videos to watch, but simply, it is having several layers of the image built up by using foam tape or silicone glue.  Usually, the layers would be built up by what would stick out farther.  So imagine the figure was laying flat on it's back..what parts would be to the back and what would be at the top..most the times the nose would be the highest point..but not many people just cut the nose out unless it would be a snowman, so the head would be the last layer or anything in the hair (example the button on the headband on my card is the last layer. )  Click Here to see my tutorial on making your own 3-D decoupage art using a digital image.

Well, what's cool about My Besties 3-D decoupage sheets is that the layering is already figured out for you, all you need to do is cut the pieces out and glue them on top of each other! Oh and you get digital paper as well!  I've used the digital paper on my card.

The new 3-D decoupage sheets are found here!

Here is my card i'd love to share with you!
Looking from the side you can see the 3-d look on the image and roses.  The hearts and buttons are also included in the 3-D deco sheets! 

The My Besties 3-D sheets i used:


Check out my Design Team Mates projects as well..my jaw is still dropping in Awe!

Julie Team Leader
Angela
Miranda
Deidre
Bonnie (me)


I loved this image so much i transformed the dress into a dress for my granddaughter:


Challenges:
Crafts Galore Encore Challenge- Bling, gem, glitter
Creative Cottage- Love
Scrapbook Blessings- Love is in the Air
Cute Card Thursday- Clever Cutting
The Outlaws- Thursday twist


Wednesday, February 12, 2014

A little tutorial on making a 3-d decoupage digi stamp art using a My Besties image!

Tomorrow is the big day!  It's the day when My Besties 3-D Deco challenges begin!  So to get you all excited to participate in our first challenge, i thought i'd show you how to use a digital image to make your own 3-D decoupage image art.

For your convenience, you can purchase My Besties 3-D Deco sheets at the store, these are already set up for you and all you have to do is cut them out..check those out here.

For my example i am using a My Besties i call "Garden Hat" found here.
Here is the finished card for you to see and get you enticed to make this fun art!
Another view to see the dimension:

Here is how i made my image 3-D..a lot like paper piecing but more layers!
First you need (in this case) 5 images.   (click the image below to see the layers for this image and what i cut off each layer to make the dimension)
Once you have your image cut out in layers you can then start putting the layers back on top of the base image (layer 1).

First let's talk about glue/tape.  It is suggested on line to use silicon glue, i've not found any in the local/national craft stores..you will probably have to order it on line.  So because i didn't have any on hand, i went with the foam tape.  I should have taken a picture of where i put the tape on the back, but i didn't.  A tip would be not to have it close to the edge, as it will show.

Now let's start layering: (click pictures to see closer)
Put layer 2 on top of layer one..
(of course this picture had to be blurred)                                        Now let's add layer 3 to Layer 2


Now for layer 4 to layer 3                                            For the last layer, you will add layer 5 to layer 4


Now let's see what you can do!  Thanks for looking!


Challenges:
The Shabby Tea Room- Sketch this
Fab 'n' Funky- Love/Valentine
Mod Squad Challenge- Thinking of Spring/add flowers