Pages

Saturday, January 22, 2022

We Are 3 Digital Shop - Floral Heart

Recently, i created We Are 3 Digital Shop - Floral Heart and finally had time to color it up.
I have also used some new We Are 3 Digital Paper - Backgrounds Happen


I used Prismacolor pencils to color in the Floral Heart and then i fussy cut it out.
I used a beautiful Tutti Designs die - 711 Elegant Poinsettia, it makes wonderful background foliage.
Next i just layered up the paper, die and image. I did digitally add the sentiment to the center of the heart  before i printed it out.  It's easy to do because the sentiments are PNG format and you just layer them on top of your images (or paper) just like you would a watermark. 


I would love for you to visit We Are 3 Digital Shop Facebook group and share your cards/projects created with We Are 3 Digital Shop paper/images and sentiments.  
Visit us by clicking here!

Click here for the We Are 3 Etsy Store link

Challenges:

Friday, January 21, 2022

Alicia Bel - Dancer Daisy

 Just for fun, i wanted to color an image that i printed off years ago.
I was tagged in Facebook in The Wonderful World of Alicia Bel because she is having a new challenge and anyone that enters will get a free image.
I truly love her stamps and used to make cards for all of her challenges.

This sweet Alicia Bel image is called, Dancer Daisy
you can find her here! 
If you would like to play along for this challenge, you don't have a lot of time..it ends on
and you can find the challenge here!
The challenge is to:
Use vegetable parchment paper, tissue paper, acetate, cellophane or some material with transparency in your project.

This was a bit hard for me because, the transparent vellum and organza flower petals do not show.

To try to help make the vellum snowflakes show i backed them with white cardstock.
The organza flower petals are behind the large snowflake.

If i would to do this again, i would totally use a different background.. but i had wanted subtle.
Next, i wasn't overly happy with the background. I wanted to use a die cut negative...that is the "cut out" opening. The paper had some stenciling on it to begin with and i didn't like it so much..so i added more using 3 stencils. lol. I also wanted to put "something" in the cut out opening so i made a glowing moon.
Usually, i'd tear this apart and start over, but i am going with it for now.
She is a really pretty stamp...and that is what i am focusing on.
I think this card kind of represents life for me right now... there is always something good i can focus on when everything around me seems not so great.

Thanks for stopping by..i hope to create some more randomness.


Tutti Designs - 490 Love Floral

Hello!  Let's see what you can create with Tutti Designs today!

Sending a bit of Love!

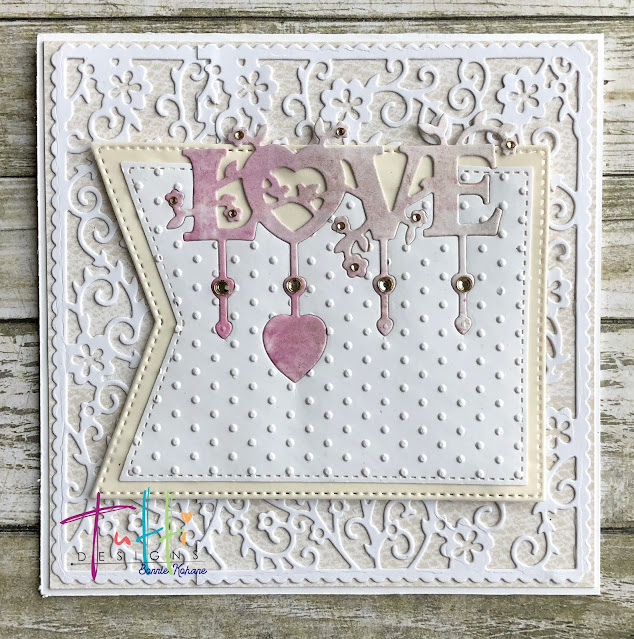
So i saw this card on Pinterest that die cut out a section of their die and then replaced it with the full cut out.  So i gave it a try!  
(I also saved the partially white cut out and used it on my previous Love card i blogged)
Soooo, what i started with is Tutti Designs - 214 Stitched Nesting Banners and cut it out from white cardstock.  Then i placed Tutti Designs - 490 Love Floral at the top (long side of the banner) as shown.  I embossed the white banner with a dotted embossing folder.  Next i cut out a larger banner to put behind the white banner.  For the Love die, i used a piece of paper that i made from a gel print. Now just like a puzzle, i put the "pink" Love die cut into the cut out section of the white cardstock banner.  You can see that i did not keep the negative pieces of the pink or white die cut so that the background banner (cream) could show through. 
Now for a bit more tricky part.. i cut the Tutti Designs 636 Heart Frame twice to layer behind the banners and on top of the first layer of cream paper that is on the card base.  I wanted more of a continuous look so i trimmed back the two layers so it "looks" like they are one piece.  Not so tricky when you can see what i mean. 

Now i just layered the banner sections on top of this section and added some gems.  
Well a lot of gems on the die cut.  


I have used:


Be sure to visit Tutti Designs
for LOTS more fabulous dies and
come back again for more Tutti Designs inspiration!

Here are some Tutti Designs quick links:


Thursday, January 20, 2022

Fairy Hugs Sentiment - Make A Wish

 Hello everyone and Happy Thursday!! 

I am a DT for Fairy Stamper Hugs!
It is the #1 USA Retailer for Fairy Hugs Stamps
Check out the store here!!
 
Azalea told Freddie to make a wish....

I really enjoyed creating this card! 
I started out with We Are 3 Digital Paper - Inky Scenes.  I auditioned my stamps by using the acetate that comes with the stamps.  I made Azalea into a mask, and stamped her in VersaFine Ink - Nocturne. Next i stamped Freddie using VersaFine Ink - Morning Mist.  I took off the mask and colored in Freddie and Azalea with Prismacolor pencils..i also added a few grass blades as well.  Next i stamped the Fairy Hugs Sentiment - Make a Wish and Fairy Hugs - Sparkle Dust in VersaFine Clair - Nocturne.  I pulled out the new Fairy Hugs - Stencil - Swirls and inked the top of the card using Chipped Sapphire. Then i splattered some white acrylic paint on the top half of the card.  

Fairy Stamper Store Supplies:


Like us on Facebook
Follow us on Instagram: Fairy Stamper Hugs
Join our NEW Fairy Stamper Hugs Facebook Group here

 Don't forget to include #fairystamperhugs on your projects and tag us at @FairyStamperHugs so we can be sure to see and comment on your projects!

Sign up to receive Fairy Stamper Newsletters at the Fairy Stamper store.

Wednesday, January 19, 2022

Tutti Designs - 648 Cones & Branches, Deer in Forest

Hello!  Let's see what you can create with Tutti Designs today!


Well, you know when i start using a die, i have the positive and negative and it drives me crazy not to use the negative.  You've already seen both the positive and negative cards i have created recently.. here is yet another one, but it is a bit different than the ones i have shared so far. 
So, the positive cut out i haven't shared yet, it will be coming in another post.
For this card i used a decoupage glue.. it made it way easier to attach the negative to the background..but because i used digital paper printed from an ink jet printer, it also changed the color of the purple and blue papers to a darker hue.
So this card is really an easy card to make as well, just die cut out the deer die (i used a 4 x 4 square), making sure to save the small negative bits too.  I saved out the positive, like i said, for another card. Next you use the mod podge/decoupage glue on the back of the negative cut out and glue it onto another piece of paper, in this case i used a royal blue paper. You always have a bit of seepage from the glue and it changes the color of the digital paper, so i just went ahead and added the decoupage glue lightly to the entire top of the diecut layers.  I matted this entire layer to white cardstock to off set it from the background snowflake paper.
Next i added foam tape to the back and adhered it to the snowflake layer paper.
For some added interest, i added snowflakes and a fir branch Tutti die.  Then for some "bling" i added pearls and gems. 

I have used:


Be sure to visit Tutti Designs
for LOTS more fabulous dies and
come back again for more Tutti Designs inspiration!

Here are some Tutti Designs quick links:


Tuesday, January 18, 2022

The Paper Shelter - The Best Nap Ever

I love seeing Christmas cards every day, do you?

Kerst Christmas Facebook Group has a challenge monthly.
You can share ANY Christmas cards and have a chance to win prizes, too!

Kerst Christmas Facebook Sponsor this month

Here is my DT card using The Best Nap Ever

Dies used


Please visit us at Kerst Christmas Facebook Group here

I am the owner of We Are 3 Digital Shop 
and would love to invite you to We Are 3 Digital Shop Facebook Group!

Challenges:

Monday, January 17, 2022

Fairy Hugs - Beary Family

Hello everyone and happy Monday!! 
It’s time for a new Fairy Stamper YouTube featuring Fairy Hugs stamps.
      
Every week you will see 
Fairy Stamper YouTube Tutorial Videos by the Fairy Stamper Design Team

Please subscribe so you won't miss a video!

Let's do some simple "watercolor" stamping.

You can watch how i created this simple card by watching my YouTube Tutorial here:


Fairy Stamper Products Used 


 Store ** Facebook Challenge ** Facebook** Instagram ** YouTube

Like us on Facebook
Follow us on Instagram: Fairy Stamper