
For this card i have used a free snowman coloring page image. I am casing a card i found online...that i had saved.
This is the finished card:
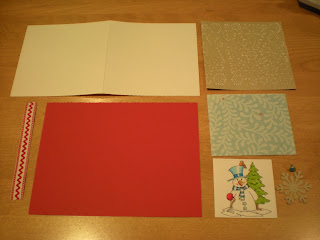
 What you will need:
5.5 x 5.5 white card base
5.25 x 5.25 first layer (i used tan w/a white core for embossing)
4.5 x 3.75 pattern paper (i used blue)
6 x 11.5 mat paper (i used red)
Image 3" high (cut at 3 x 3)
2" tan snowflake, 1" tan snowflake, brad and jem for snowflake centers
6" ribbon
3 red gems (or ones to match your card)
Embossing folder- (I used snowflakes)
 1. Emboss your 5.24 x 5.24 tan white core paper and emboss..(the folder isn't big enough, so i lined it up and did it twice for the overlap). Attach to cardbase front. Mat the pattern paper and image on red paper.
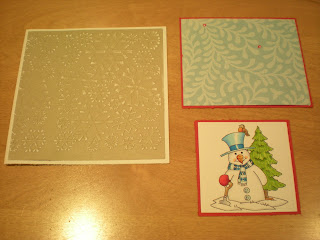 2. Add ribbon to the matted pattern paper and add the matted image on top. (I used foam dots for my matted image).
3. Punch out or die cut your snowflakes. I adhered them to the matted image/paper and then punched the large snowflake in the middle for the brad. I added a gem to the smaller snowflake.
4. Now you can place the matted section on your card base that has the embossed paper on it.
5. I typed up my sentiment using the "Frosty" font and matted that as well. Then i put 3 gems next to the sentiment. That's it...it was kind of fun, right?
Challenges:
Aud Sentiments- Any Winter theme
This is the finished card:

5.5 x 5.5 white card base
5.25 x 5.25 first layer (i used tan w/a white core for embossing)
4.5 x 3.75 pattern paper (i used blue)
6 x 11.5 mat paper (i used red)
Image 3" high (cut at 3 x 3)
2" tan snowflake, 1" tan snowflake, brad and jem for snowflake centers
6" ribbon
3 red gems (or ones to match your card)
Embossing folder- (I used snowflakes)


3. Punch out or die cut your snowflakes. I adhered them to the matted image/paper and then punched the large snowflake in the middle for the brad. I added a gem to the smaller snowflake.
4. Now you can place the matted section on your card base that has the embossed paper on it.
5. I typed up my sentiment using the "Frosty" font and matted that as well. Then i put 3 gems next to the sentiment. That's it...it was kind of fun, right?
Challenges:
Aud Sentiments- Any Winter theme
Fabulous card, lovely colouring. Thank you for playing at Aud Sentiments.
ReplyDeleteHugs Ali x
Great card, love the image. Thanks for joining us at Aud Sentiments this time. Carol DT x
ReplyDeleteLovely! Thanks for the mini tutorial and the link to the coloring book site. I'm so glad you shared your creativity with us at Aud Sentiments during our "Winter" challenge! Good Luck!!!
ReplyDeleteThanks for playing in our winter card challenge at Aud Sentiments
ReplyDelete