Pages

Showing posts with label Tutti Designs - 711 Elegant Poinsettia. Show all posts

Monday, April 3, 2023

Tutti Designs - Floral Hoops, Happy Spring!!

Hello!  Let's see what you can create with Tutti Designs today!


You can make this card simply.  When i created the last Tutti Card (easel card), i needed the blue for the background.  So i die cut this Tutti Designs - Floral Hoops from a blue inked background, and saved the actual die for this card.   I inked up a card stock with Distress Oxide Ink - Squeezed Lemonade and Fossilized Amber.  I also used a Sizzix Tim Holtz 3D embossing folder called, Woven to get the texture behind the die. Next i die cut Tutti Designs - Elegant Poinsettia and put that behind the yellow background.  Just a bit of it peeks out, but it's perfect.  Now, i die cut Tutti Designs - Fancy Bow twice from white card stock.  This time i used some seam ribbon to make a "knot" in the center of the bow. It has a piece of double sided foam tape between the bow at the knot area. I then attached it to the Floral Hoop at the base with a glue dot. The paper in the back ground is from We Are 3 Digital Paper. 

I have used:


Be sure to visit Tutti Designs
for LOTS more fabulous dies and
come back again for more Tutti Designs inspiration!

Here are some Tutti Designs quick links:

Also used:

Saturday, January 22, 2022

We Are 3 Digital Shop - Floral Heart

Recently, i created We Are 3 Digital Shop - Floral Heart and finally had time to color it up.
I have also used some new We Are 3 Digital Paper - Backgrounds Happen


I used Prismacolor pencils to color in the Floral Heart and then i fussy cut it out.
I used a beautiful Tutti Designs die - 711 Elegant Poinsettia, it makes wonderful background foliage.
Next i just layered up the paper, die and image. I did digitally add the sentiment to the center of the heart  before i printed it out.  It's easy to do because the sentiments are PNG format and you just layer them on top of your images (or paper) just like you would a watermark. 


I would love for you to visit We Are 3 Digital Shop Facebook group and share your cards/projects created with We Are 3 Digital Shop paper/images and sentiments.  
Visit us by clicking here!

Click here for the We Are 3 Etsy Store link

Challenges:

Tuesday, January 4, 2022

Tutti Designs - Elegant Poinsettia, Ornamental Snowflakes and Snow Flurries Collage

Hello!  Let's see what you can create with Tutti Designs today!

I was thinking about winter and snow..so i made this card...


This is a collage of snowflakes and a pretty poinsettia doily. I used several different digital pattern papers and then i added silver glitter embossing powder to several of the dies to add some sparkle.  For the Ornamental Snowflakes, i cut the inside design out and placed the largest snowflake from Snow Flurries in the center instead.  I needed to make the collage smaller so i could mat it on this card so i saved the outside i cut off so i could use it on another card as a frame.  I used a square die to cut out the outside edge (which made a frame)

I have used:


Be sure to visit Tutti Designs
for LOTS more fabulous dies and
come back again for more Tutti Designs inspiration!

Here are some Tutti Designs quick links:

I have also used:


Saturday, October 23, 2021

Tutti Designs - 707 Sunburst Madonna

Hello!  Let's see what you can create with Tutti Designs today!


This is a beautiful die and so easy to make into a lovely card!
First, i die cut Tutti Designs - Sunburst Madonna using silver mirrored card.
I saved a few of the negative pieces to add back into the die. (check out the photo to see which pieces i saved/used). Next i glued the die and the negative pieces to We Are 3 Digital Paper - Bokeh Blends.  I thought it gave a bit of a stained glass look in a modern way. I trimmed around the excess paper off of the sides.  This would make a beautiful ornament as well.  *The outside is symmetrical so you could die cut another Madonna and paper and add it to the back.
Next i used my favorite die - Elegant Poinsettia to frame Sunburst Madonna. I cut out one more die - Stitched Postage and embossed it with a snowflake embossing folder to frame the entire design. Now all you need to do is layer everything on the paper base layer.


I have used:


Be sure to visit Tutti Designs
for LOTS more fabulous dies and
come back again for more Tutti Designs inspiration!

Here are some Tutti Designs quick links:


Sunday, October 10, 2021

Krafty Tutti Designs - 711 Elegant Poinsettia

Hello!  Let's see what you can create with Tutti Designs today!

As you can tell i have been enjoying the Tutti Designs Christmas release!


For this card, i used kraft paper for the base.  I embossed the paper with Tim Holtz Sizzix 3D embossing folder - Swirls. Next i added some "burlap" trim.  I diecut Elegant Poinsettia 3 times (silver (outline used on another card), off white and gold metallic.  The silver outline layer was cut for another card, i saved the "negative parts" to use on this card to make "the flower petals".  As shared in my other posts, i put a cut out circle behind the poinsettia petals so i have something to adhere the petals to. I layered the off white/silver petal layer on top of the gold metallic layer. I glammed this card up a bit by using a lot of clear gems in the circle (berries) cut outs.  The layered elegant poinsettia was adhered to the burlap trim.
Last,  i stamped Visible Image sentiment to vellum and heat embossed it with clear embossing powder.  I hand cut around it and ran it through my small xyron tool and then adhered that to the center of the elegant poinsettia.

I have used:


Be sure to visit Tutti Designs
for LOTS more fabulous dies and
come back again for more Tutti Designs inspiration!

Here are some Tutti Designs quick links:

Tutti Designs - 657 Candy Canes

Hello!  Let's see what you can create with Tutti Designs today!


I wanted a more vintage style candy cane, but it didn't go the way i had planned.
How i started was, i used some Distress Oxide ink to make the candy cane. I inked up white cardstock and then cut out Tutti Designs - Candy cane.  Next i used VersaMark Ink so i could add some sparkle to the diecut.  I glued the cut diecut to white cardstock and cut that layer out leaving a white edge.  I cut the candy cane die twice from another inked paper and used the negative bow parts for this project. I used some Distress Oxide ink to watercolor the leaves and added some pearls to the circle cut outs.
Next i used Tutti Designs - Elegant Poinsettia and cut that out of silver glitter paper.  I used that to frame out the candy canes.
To give more texture to my card i used Tim Holtz 3D embossing folder - Intertwine
 
I have used:


Be sure to visit Tutti Designs
for LOTS more fabulous dies and
come back again for more Tutti Designs inspiration!

Here are some Tutti Designs quick links:

Friday, September 24, 2021

Tutti Designs - 711 Elegant Poinsettia.. AGAIN

Hello!  Let's see what you can create with Tutti Designs today!


You can see how beautiful and versatile this Tutti Designs - 711 Elegant Poinsettia is.  At first i didn't really notice the center was a poinsettia..and since i discovered it i have had so much fun changing the center part out to different colors.
I layered this one with an aqua paper.  To get the poinsettia sections to stay in i used a circle behind the parts i needed to add (gold). I also accented the poinsettia die with Tutti Designs - 716 Holiday Foliage and i added my favorite Tutti Designs - Snow Flurries with gems in the center.

The background embossing folder is from Crafters Companion called, 
The paper i used is one i made from a Gell Press.

I have used:


Be sure to visit Tutti Designs
for LOTS more fabulous dies and
come back again for more Tutti Designs inspiration!

Here are some Tutti Designs quick links:


Tuesday, August 31, 2021

Tutti Designs - 711 Elegant Poinsettia

Hello!  Let's see what you can create with Tutti Designs today!


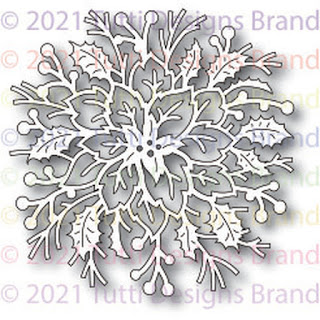
This is an amazing die!  When i first looked at this Tutti Designs - 711 Elegant Poinsettia  i missed the center being a poinsettia because when i first had the die i didn't know the name, just the number.. when you save the negative parts and put them back in it then looks so beautiful!
So as you can see, i cut the die 3 times.  Once in black as the "outline" base.  Once in gold to layer behind the outline base.  And then i cut a small section of the center making sure i got all of the poinsettia petals.  The tricky part?  How did i keep the petals in the negative spaces?
I decided to cut a circle of gold metallic small enough but large enough to go behind the poinsettia petals of the "outline" black base. By cutting the small circle out of gold it became the center dots of the flower.  Now i have something i can glue on to keep the petals in place.
The white back ground is an embossing folder from my stash. The sentiment is We Are 3 Digital Sentiments - Christmas which fit perfectly inside of Tutti Designs - 214 Stitched Banners

I have used:


Be sure to visit Tutti Designs
for LOTS more fabulous dies and
come back tomorrow for more Tutti Designs inspiration!

Here are some Tutti Designs quick links: