Saturday, April 30, 2022

Alicia Bel - Spray Can Boy Challenge Freebie

Just at the last minute, i finished my card for 
Her images are so delightful!

For this challenge the theme is stitching and i chose to use a Lawn Fawn die i purchased recently saying, hello.
I am using Alicia Bel's challenge freebie from March.

Simply colored the image with Prismacolor pencils, die cut the Lawn Fawn "hello" and hand stitched that with embroidery floss.  I hand cut around the hello die to make it look like a cloud or puff from the spray can the image is holding. I put both items on the We Are 3 Digital Paper - with foam tape.


I would love for you to visit We Are 3 Digital Shop Facebook group and share your cards/projects created with We Are 3 Digital Shop paper/images and sentiments.  
Visit us by clicking here!

Click here for the We Are 3 Etsy Store link

Challenges:

Wednesday, April 27, 2022

NEW Fairy Hugs Release! Introducing Ann Marie and Sheldon!

Hello everyone and Happy Wednesday! 

Let's see what we can make using Fairy Hugs Store supplies! 

I am using Fairy Hugs - Ann Marie and Sheldon!

I considered this card to be my "grand finale" card.. but i have several more to share with you yet. 
It is a wonderful release.  I am loving the Coffee/Tea theme!  You will not find anything like these stamps.  I love, love the Fairy Hugs - Sunflower Table!  So let's see what i did with this card...
I started with Fairy Hugs Craft Paper - Bumbletwinkle.  It looks like it has actual texture but it is a "faux" texture..it is perfectly "flat" with no raised areas.  I started with making a Fairy Hugs - Ann Marie mask and a Fairy Hugs - Sheldon mask.  This allowed me to have those two stamps in front of the table and seated on the tree trunk seats. So that means you need to use your acetate that comes with the stamps so you can figure out the placement of your stamps.  I then stamped Ann Marie and put the table acetate down and positioned Sheldon and stamped him as well.  I put both of the masks down and could easily stamp the Sunflower table and the trunk stools.  To have a bit of contrast, i stamped Ann Marie and Sheldon in VersaFine Clair Ink - Nocturne and the Sunflower table and tree trunks in VersaFine Clair Ink - Acorn.  Now i stamped the - Tea Icons on top of the table and on top of the Sunflower "umbrella".  Fairy Hugs Sentiment - Coffee Friend fit perfectly in the sun.  I wanted to add a bit more interest and used Fairy Hugs Stencil - Fairy Bubbles with Molding paste and glitter embossing powder. And then to finish off the card, i colored in the images using Prismacolor pencils and a sparkly gold gel pen.

Fairy Hugs Store Supplies:


Like us on Facebook
Follow us on Instagram: Fairy Hugs Store
 Join our Fairy Hugs Facebook Group here

 Don't forget to include #FairyHugsStore on your projects and tag us at @FairyHugstore so we can be sure to see and comment on your projects!

Sign up to receive Fairy Hugs Newsletters at the Fairy Hugs store.

 
Thanks for stopping by!

Tutti Designs -737 Heart Frames - Featuring "Ed".

Hello!  Let's see what you can create with Tutti Designs today!


For this card, i used an alcohol ink paper i turned digital.  The colors were all about this photo of "Ed". He is such a pretty cat and i wanted to make this card for a friend. 
So the only thing "tricky" about this card is making a template for the "photo" opening.  If you look close, there are 2 rectangles overlapping each other.  Depending on your photo you can decide which rectangle/photo you want to be "forward".  
Remember this doesn't need to be a photo, it can be a sentiment, a stamped image, a scene.. 
The opening size is about 4.25" x 3".  I would make a test cut and see how it fits first.

So once you have your photo printed and cut to the right size.  You can cut another paper (rectangle the same size) to place behind it.  I glued both the photo and the extra rectangle behind the heart frame.  You have another option, if you don't want to put another rectangle behind your photo, just save the cut out corners and fill them in or don't put a rectangle backing behind at all.

I also "fussy die cut" some more hearts to make them "3D".  You will have to also fussy cut the frames off the hearts as well. I bent them in half and glued them on in the centers of each heart
One heart i saved out for the cat's name, "Ed".  
I hand cut those letters because i didn't have the perfect alphabet dies to use.

I have used:

Be sure to visit Tutti Designs
for LOTS more fabulous dies and
come back again for more Tutti Designs inspiration!

Here are some Tutti Designs quick links:

Also used:

Tuesday, April 26, 2022

New Fairy Hugs Release! Featuring - Teapot Cottage

Hello everyone and Happy Release day! 

Fairy Hugs New release will be on Create and Craft on April 26 & 27
and in the Fairy Hugs store on April 26.
If you are in the UK, Fairy Hugs can be found at Julia Watts Crafts

Let's see what we can make using Fairy Hugs Store supplies! 

I am using Fairy Hugs - Teapot Cottage

For this card, i started out with Fairy Hugs Craft Paper - Petalshimmer. Next i made a mask for Fairy Hugs - Teapot Cottage and cut it out.  I figured out the stamp placements and stamped the Teapot Cottage. Next i stamped Fairy Hugs - Sunflower Table (just the top of it) so it looks like an umbrella for the Teapot Cottage. Next, i stamped Fairy Hugs Sentiment - Coffee Friends. I added the Fairy Hugs - Steam to the spout of the teapot. I pulled out an older stamp set called, Fairy Hugs - Fairy Dwellers and stamped them on the Teapot cottage and below on a torn paper "hill" i made with Distress Oxide Ink - Chipped Sapphire.  Last i colored the images in with Prismacolor pencils and a gold sparkly gel pen.

Fairy Hugs Store Supplies:


Like us on Facebook
Follow us on Instagram: Fairy Hugs Store
 Join our Fairy Hugs Facebook Group here

 Don't forget to include #FairyHugsStore on your projects and tag us at @FairyHugstore so we can be sure to see and comment on your projects!

Sign up to receive Fairy Hugs Newsletters at the Fairy Hugs store.

 
Thanks for stopping by!

Fairy Hugs NEW release in Stores! Mixed Media - Fairy Teacup

 Hello everyone and Happy Fairy Hugs Release day! 

Fairy Hugs New release will be on Create and Craft on April 26 & 27
and in the Fairy Hugs store on April 26.
If you are in the UK, Fairy Hugs can be found at Julia Watts Crafts

Let's see what we can make using Fairy Hugs Store supplies! 

I am using Fairy Hugs - Fairy Teacup!

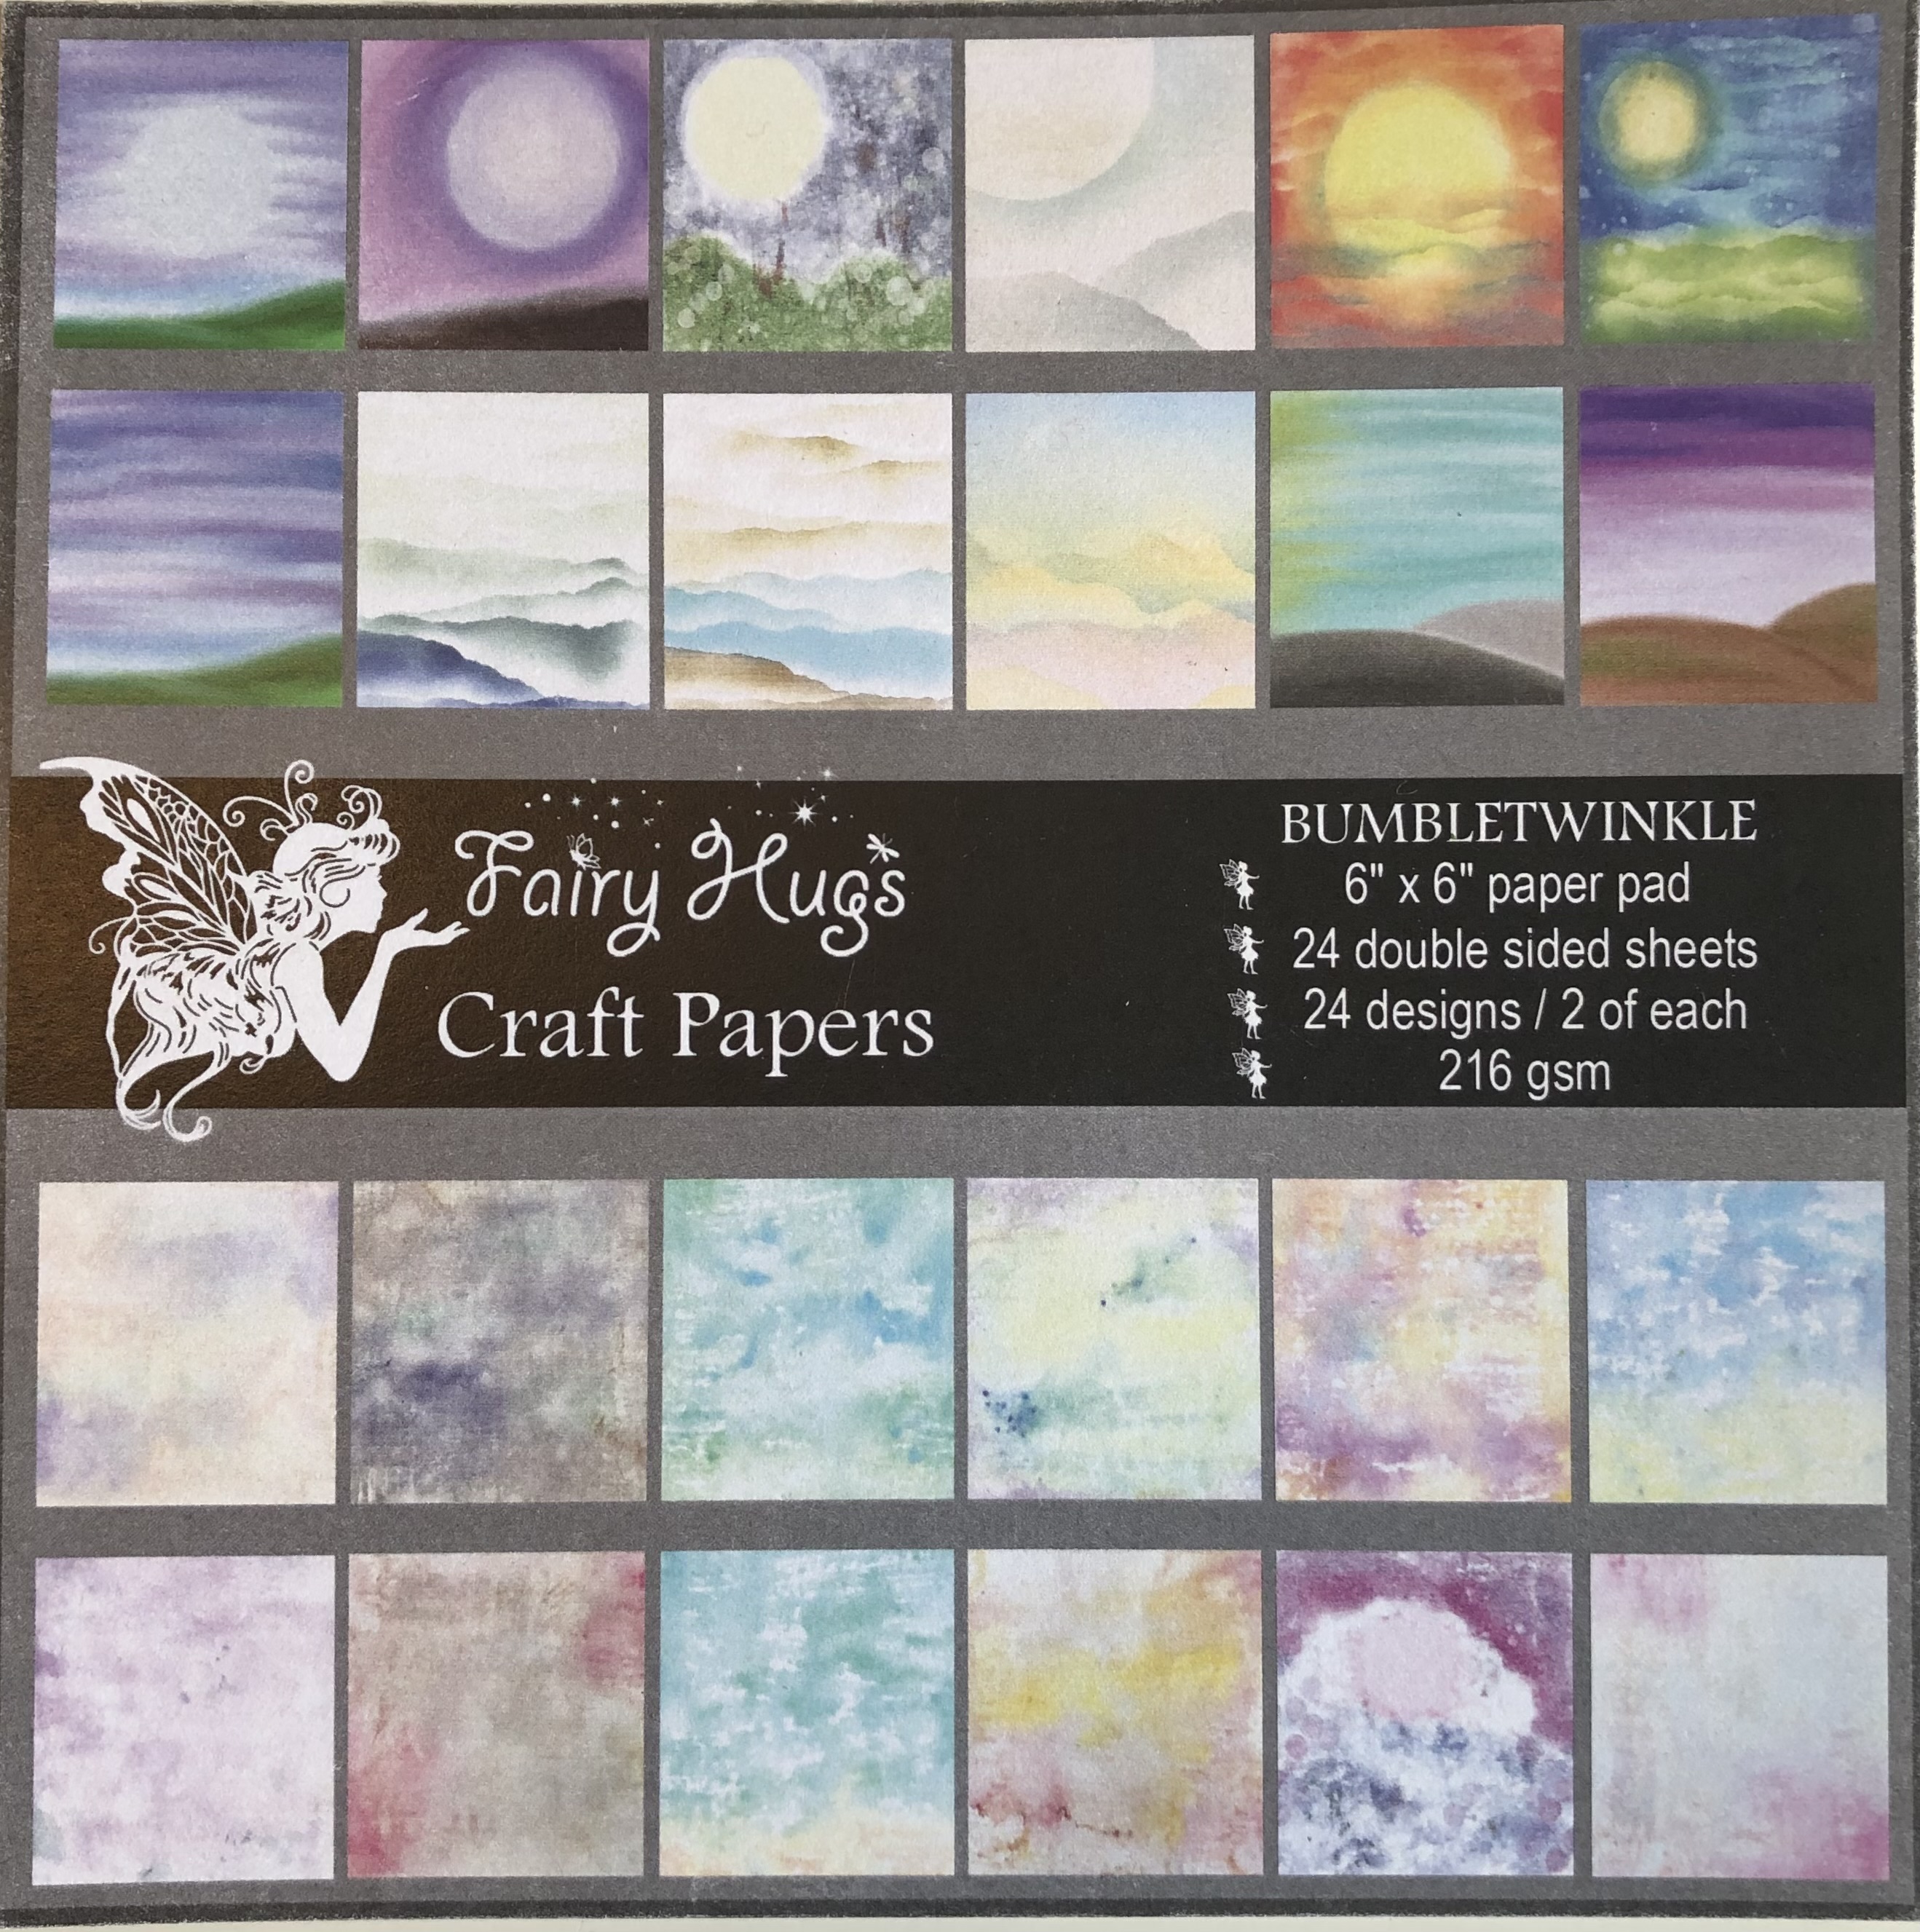
For this card, I am using Fairy Hugs Craft Paper - Petalshimmer designed by Shwu-Miin Tang

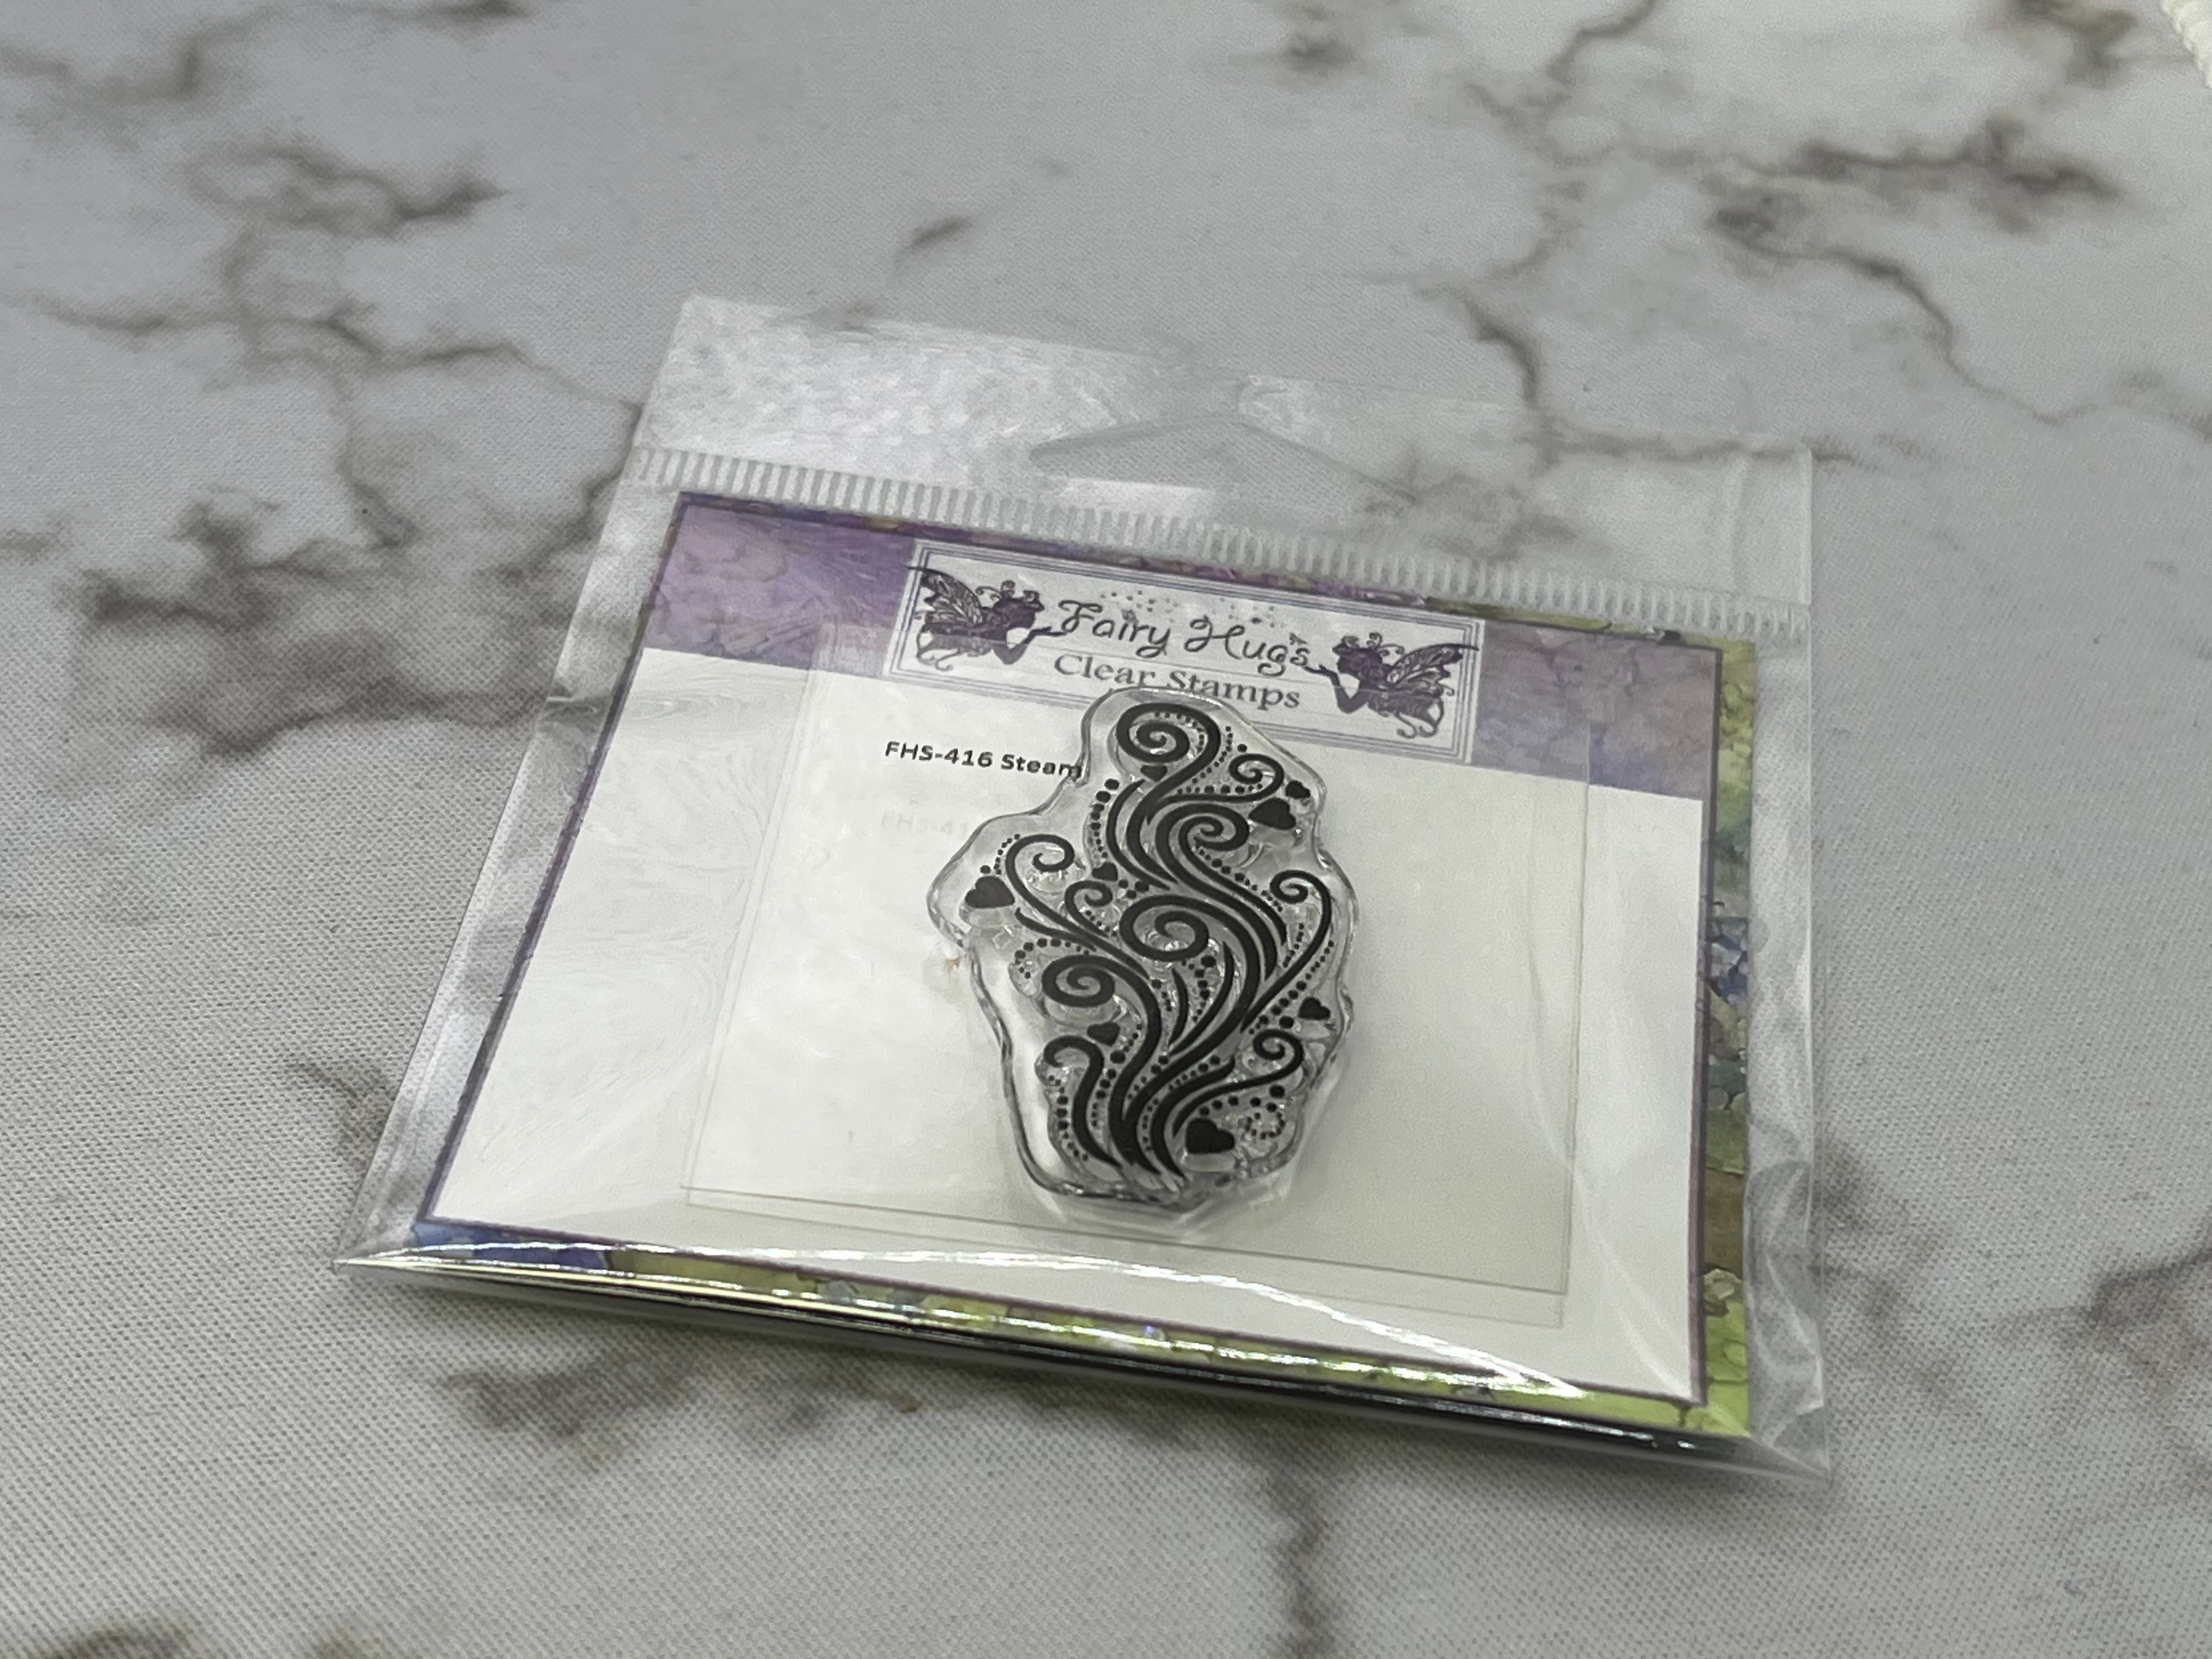
I wanted to get as much use out of one paper as i could.  So i die cut a Tutti Designs - Stitched Nesting Tag from the paper and set the paper aside. Then I die cut a larger tag from cardstock and stamped it with Fairy Hugs - Coffee Word Collage and then i inked the edges with Distress Oxide Ink - Salvaged Patina.  Next i diecut out a circle that "just fit" inside of the tag.  I needed that circle so i could stamp Fairy Hugs - Fairy Teacup.  *note not all of the teacup handle fit on that circle..which is why i inked up some card stock with VersaFine Clair - Golden Meadow (it matches perfectly with this paper sheet) and stamped and fussy cut out the butterfly from Fairy Hugs - Thank you set.  Next, i wanted to pull in some more interest and color, so i inked up some card stock with Distress Oxide - Dusty Concorde and diecut Tutti Designs - Bell Flowers.  I cut those apart so i could put them on both sides of the Fairy Teacup.  But let me back up... i die cut a Marianne design doily to cover up the circle i cut from the tag and inked that with Distress Oxide Ink - Vintage Photo.  I then cut out another circle to mat the Fairy Teacup and inked the edges with Distress Oxide Ink - Dusty Concord and Chipped Sapphire. 
Okay, so let's layer up what we've made so far. *note i did used foam tape between the purple circle and the brown doily. The largest tag with the Coffee Word Collage, the Petalshimmer tag, the brown doily, (i placed the Tutti Designs Bell flower (left piece i cut off the main die) in between the dark circle and the doily) add the dark circle and the left side of Tutti Designs - Bell Flower. Next i colored up the Fairy Hugs - Fairy Teacup and put that on top of the layers.  Next i glued the butterflies on top.   
Set that aside and pull out the background Petalshimmer paper that has had the tag cut out of it. One the left hand side i have used a Fairy Hugs Stencil - Water Stains with Molding paste and Distress Oxide Embossing Glaze.  As soon as i lift off the stencil i add the Embossing glaze and let that set for a bit.. i don't want it completely dry before i heat emboss it.  I could have used a static powder, but i actually like the powder that way.. if you don't use the static powder before you get started with the molding paste.  I love the glaze look i get when i use the embossing glaze.  Ok, so i decided to stamp the entire Coffee Word Collage again and fussy cut out the one sentiment, distressed it with Distress Oxide Ink - Vintage Photo and used a piece of the Dusty Concord inked paper from the Bell Flowers to mat the sentiment.  Now for putting it all together.. adhere the stencilled paper to the card base.  Then adhere the tag combination to the stenciled paper.   
Next, i added the sentiment with foam tape and glued on some gold metal sequins.

Fairy Hugs Store Supplies:


Fairy Hugs - Thank you Set (from retailer Fairy Stamper)


Like us on Facebook
Follow us on Instagram: Fairy Hugs Store
 Join our Fairy Hugs Facebook Group here

 Don't forget to include #FairyHugsStore on your projects and tag us at @FairyHugstore so we can be sure to see and comment on your projects!

Sign up to receive Fairy Hugs Newsletters at the Fairy Hugs store.

 
Thanks for stopping by!

Monday, April 25, 2022

Fairy Hugs NEW Release! Fairy Hugs Craft Paper Pad - Petalshimmer

  Hello everyone and Happy Sneak Peek Release day! 

Fairy Hugs New release will be on Create and Craft on April 26 & 27
and in the Fairy Hugs store on April 26.
If you are in the UK, Fairy Hugs can be found at Julia Watts Crafts

Let's see what we can make using Fairy Hugs Store supplies! 

I am using Fairy Hugs - Fairy Hugs NEW Release - PetalShimmer Craft Paper Pad!

For this card,  I started with a sheet of paper from Fairy Hugs Craft Paper Pad - Petalshimmer.   Shwu-Miin Tang (Fairy Hugs designer) designed this paper and it is gorgeous!
I made a mask for Fairy Hugs - Nigel.  Each Fairy Hugs stamp comes with an acetate photo of the actual stamp.  This acetate works well to figure out placement of your stamps. I made a layout with the acetate photos so i would know where to stamp the images. First, i stamped Fairy Hugs Nigel and placed the mask on top of him.  Then i stamped the hanging Fairy Hugs - Fairy Teacup, so it looked like Nigel was resting against it. I kept the mask on Nigel and also stamped Fairy Hugs - Stacked Teacups. Now i took off the mask.  Next, i stamped Fairy Hugs - Ginkgo Branch.  Next i made a mask of the top (flower and part of the stem) of Fairy Hugs - Sunflower Table.  I positioned the top of the Sunflower table stamp just under the base of the stacked teacups.  Now, i put the mask on top of the Sunflower i just stamped.  Then i and stamped two more times using the Sunflower Table stamp on each side of the middle Sunflower i just stamped.  This way there isn't any overlapping petals.  I put the mask on the left flower i just stamped and proceeded to stamp Fairy Hugs - Teacup Flowers.  I did the same thing for the right Sunflower Table bloom and just stamped one of the Fairy Hugs - Teacup Flowers.  I pulled out Fairy Hugs - Steam and stamped that above the last Teacup flower i stamped.  Last thing i stamped is the Fairy Hugs Sentiment - Returning to You. Now for some Prismacoloring.  This paper works well for stamping and pencil coloring! I also added some Pentel Gold Sparkly Gel Pen!

Fairy Hugs Store Supplies:
Fairy Hugs - Nigel

Fairy Hugs - Fairy Teacup

Fairy Hugs - Stacked Teacups

Fairy Hugs - Sunflower Table

Fairy Hugs - Steam

Fairy Hugs - Ginkgo Branch

Fairy Hugs Sentiment - Returning to You

Fairy Hugs Craft Paper - Petalshimmer

Like us on Facebook
Follow us on Instagram: Fairy Hugs Store
 Join our Fairy Hugs Facebook Group here

 Don't forget to include #FairyHugsStore on your projects and tag us at @FairyHugstore so we can be sure to see and comment on your projects!

Sign up to receive Fairy Hugs Newsletters at the Fairy Hugs store.

 
Thanks for stopping by!

Fairy Hugs NEW Release - Tea or Coffee theme! Introducing - Nigel

Hello everyone and happy Monday!! 
It’s time for a new Fairy Stamper YouTube featuring Fairy Hugs stamps.
      
Every week you will see 
Fairy Stamper YouTube Tutorial Videos by the Fairy Stamper Design Team

Please subscribe so you won't miss a video!


I made two cards, one was a "template" for my video.  
Just a bit different with the color of the leaves/berries and a different sentiment.

Here is the YouTube Video tutorial Link:


Fairy Stamper Products Used 
 Fairy Hugs - Nigel (mouse)

Fairy Hugs - Lost in Time

Fairy Hugs - Ginkgo Branch 

Fairy Hugs Sentiment - Tea Word Collage 


 Store ** Facebook Challenge ** Facebook** Instagram ** YouTube

Like us on Facebook
Follow us on Instagram: Fairy Stamper