
You thought you were going to be seeing a Christmas tree right and not a star..but wait until you see what i did do with a Memory Box Snowflake Tree die!
This is my second release for Dutch Paper Crafts and i am again using a Memory Box die called Snowflake Tree #98405.
For this project i made two items..a star and a card. I used the negative cut for the card and 5 dies for the star.
This project is also for my DT at Stamptacular Sunday where we are using an inspirational photo for our project/card.
 Some other supplies i used:
Memory Box Starry Wreath #98403 (available at Dutch Paper Crafts)
Spellbinders Standard Circle Die S4-116
Tilda with Star- Magnolia
Baker's Twine
Wire Tinsel from Hobby Lobby
Silver Stickles
Here is what i did:
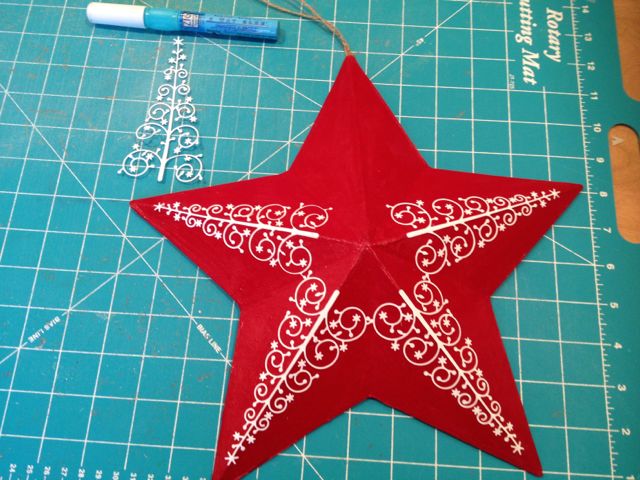
I purchased a 12" paper mache star from Michaels and painted it red. I glued each tree die (cut out 5) to the points of the star..knowing that i would have space in the center of the star to add the embellishments and digital image.

Next, i added a layer of decoupage glue and sprinkled the entire star with chunky white glitter. I let this dry over night. Then once it was thoroughly dry, i put another layer of decoupage over the glitter, because, in as much as i like glittery things, i don't like the glitter every where), so to apply decoupage to glitter you can't really swipe the brush you have to dab it on like when you stencil but not as hard...some glitter will come off, but most will stay on..again i wait for this to dry thoroughly.
 Not to waste any time i made the circle "medallion" for the center. I used the basic Spellbinders circle die and cut out 2 cardboard bases..(why? because i used a cereal box and wanted a bit extra weight, and i wanted to make sure the die could cut through it..and it does perfectly.) I also cut the same size circle from patterned paper..i used a subtle white/gray. I used some wired tinsel i found on a spool at Hobby Lobby..i think there is 72 feet on this spool..so look for a large spool..but you can use it forever! LOL I hot glued the tinsel behind the circle base. Next i cut out a Memory Box die (not in this release, but a good one) out of gold pressed paper found at Hobby Lobby or Michaels. I attached the star wreath to the base.
 Before you can add the Tilda and the circle base to the star, you might want to make sure the decoupage is dry..or you could carefully work with it if you want to get your project done. :) I poked a hole in the center of the star and a hole in the center of the circle base and attached it them together..don't worry about the brad it won't show once you have put your Tilda on.

You are saying, "Why haven't you added the crepe paper..well i should have thought to add it but i hadn't planned on it and when i finished attaching the circle base it looked to small and plain so it was too late to add it..but wait..it was a better idea after all. I threaded the crepe paper strip using baker's twin..just regular crepe paper streamer...doing a regular stitch in and out..but remember this is delicate paper and it will rip..just be careful and not pull hard...or if you are worried about it tearing, double up your crepe paper. I can't tell you how much crepe paper to use because i just gathered it up and i wasn't going to loosen my stitching to measure for the fear of tearing it. So keep testing it as you gather it and when you get it to where you like it cut off the crepe paper NOT the twine. I left enough twine to make a bow. You won't have to glue the crepe paper you just gathered, just wrap it under your circle base and lightly pull and position your crepe paper so that is is gathered under the circle base and now you can just tie a bow. I used silver stickles to add to the edge of the crepe paper..to give it a bit of vintage look. Now you can color and cut out your colored Tilda image. It's pretty huh? The instructions look like a lot more than it took time to do.
Stamptacular Sunday photo inspiration:
 Copics used for Tilda w/star:
skin-YR000, 00, R14, 20
hair- Y11, 21, YR23
outfit-E41, 43, CB
star- YR21, 23
ribbon- R35, 37
wings- C1, CB
Gelly Roll pen- Stardust
This card is made using the negative part from the Snowflake tree die, i also used Frostyville border #98146, Tilda w/Lamb from Magnolia.
 Copics used:
skin- YR000, 00, R14, 20
hair- Y11, 21, YR23
dress- G20, 21, 24, YG03, CB
poinsettia- R35, 37, 39
This is my second release for Dutch Paper Crafts and i am again using a Memory Box die called Snowflake Tree #98405.
For this project i made two items..a star and a card. I used the negative cut for the card and 5 dies for the star.
This project is also for my DT at Stamptacular Sunday where we are using an inspirational photo for our project/card.

Memory Box Starry Wreath #98403 (available at Dutch Paper Crafts)
Spellbinders Standard Circle Die S4-116
Tilda with Star- Magnolia
Baker's Twine
Wire Tinsel from Hobby Lobby
Silver Stickles
Here is what i did:
I purchased a 12" paper mache star from Michaels and painted it red. I glued each tree die (cut out 5) to the points of the star..knowing that i would have space in the center of the star to add the embellishments and digital image.
Next, i added a layer of decoupage glue and sprinkled the entire star with chunky white glitter. I let this dry over night. Then once it was thoroughly dry, i put another layer of decoupage over the glitter, because, in as much as i like glittery things, i don't like the glitter every where), so to apply decoupage to glitter you can't really swipe the brush you have to dab it on like when you stencil but not as hard...some glitter will come off, but most will stay on..again i wait for this to dry thoroughly.
 Not to waste any time i made the circle "medallion" for the center. I used the basic Spellbinders circle die and cut out 2 cardboard bases..(why? because i used a cereal box and wanted a bit extra weight, and i wanted to make sure the die could cut through it..and it does perfectly.) I also cut the same size circle from patterned paper..i used a subtle white/gray. I used some wired tinsel i found on a spool at Hobby Lobby..i think there is 72 feet on this spool..so look for a large spool..but you can use it forever! LOL I hot glued the tinsel behind the circle base. Next i cut out a Memory Box die (not in this release, but a good one) out of gold pressed paper found at Hobby Lobby or Michaels. I attached the star wreath to the base.

You are saying, "Why haven't you added the crepe paper..well i should have thought to add it but i hadn't planned on it and when i finished attaching the circle base it looked to small and plain so it was too late to add it..but wait..it was a better idea after all. I threaded the crepe paper strip using baker's twin..just regular crepe paper streamer...doing a regular stitch in and out..but remember this is delicate paper and it will rip..just be careful and not pull hard...or if you are worried about it tearing, double up your crepe paper. I can't tell you how much crepe paper to use because i just gathered it up and i wasn't going to loosen my stitching to measure for the fear of tearing it. So keep testing it as you gather it and when you get it to where you like it cut off the crepe paper NOT the twine. I left enough twine to make a bow. You won't have to glue the crepe paper you just gathered, just wrap it under your circle base and lightly pull and position your crepe paper so that is is gathered under the circle base and now you can just tie a bow. I used silver stickles to add to the edge of the crepe paper..to give it a bit of vintage look. Now you can color and cut out your colored Tilda image. It's pretty huh? The instructions look like a lot more than it took time to do.
Stamptacular Sunday photo inspiration:

skin-YR000, 00, R14, 20
hair- Y11, 21, YR23
outfit-E41, 43, CB
star- YR21, 23
ribbon- R35, 37
wings- C1, CB
Gelly Roll pen- Stardust
This card is made using the negative part from the Snowflake tree die, i also used Frostyville border #98146, Tilda w/Lamb from Magnolia.

skin- YR000, 00, R14, 20
hair- Y11, 21, YR23
dress- G20, 21, 24, YG03, CB
poinsettia- R35, 37, 39
Since I had the honor, as your friend, of a private viewing of these two items before you sent them off, you know how I feel about them. They are absolutely STUNNING, and I so admire your beautiful workmanship.
ReplyDeleteBonnie, you will never really know how much I admire your creative talent! Such detail and charm you add to everything you make!
ReplyDeleteOh My this star is just so stunning and thanks for letting us how it was made - just love it!
ReplyDeleteOh, Bonnie, you outdid yourself on this star. OMGoodness! I am speechless. It is so fantabulous! Utterly so. :^) And thank you for telling us how you accomplished this!
ReplyDeleteLove your sweet little card you made with the negative part of the tree. Great design on this & love the die cut, too!
Fantastic coloring on both, per your usual!
Hugs, Penny
Your star is gorgeous!! I love the image on the card, too!!
ReplyDelete