Thursday, June 30, 2022

Sneak Peek! Tutti Designs - 759 Nativity Triptych

Hello!  Let's see what you can create with Tutti Designs today!
Sneak Peek - NEW Tutti Designs Release - July 5th

Watch Tutti Designs on Create and Craft - July 4th!


Super quick card for Christmas!   I have used a We Are 3 Digital Paper for the background.
For the die cut i used Fairy Hugs Craft Paper - WinkleBush and a piece of glitter paper for the stars.
This die comes with an outline die that works perfectly for a card base.  Place your die on the fold leaving the top peaks uncut to make a card base. Cut out another piece (so you will have the full peaks)..i used the blue paper.  Attach the blue full cut to the top of the card base.  Now cut out the die from the brown paper in the Fairy Hugs - WinkleBush.  I fussy die cut the stars and then cut the points on the top of the stars that are attached the the hanging strings or for the stars embedded in the frame, i cut the points so they would overlap the frame.  Adhere the die and then add the stars and you are done!

I have used:

Be sure to visit Tutti Designs
for LOTS more fabulous dies and
come back again for more Tutti Designs inspiration!

Here are some Tutti Designs quick links:


Also used:

Fairy Hugs - Listen

 Hello everyone and Happy Thursday!! 

I am a DT for Fairy Stamper Hugs!
It is the #1 USA Retailer for Fairy Hugs Stamps
Check out the store here!!
 

Very simple card!  I started with Fairy Hugs Craft Paper - BumbleTwinkle for the background paper.  Nest i used Fairy Hugs Craft Paper - WinkleBush to cut out the Fairy Hugs Enchanted Dies - Nightglow Toadstools.  Before i added the toadstools to the background paper i placed them on the paper to see where Fairy Hugs - Bryla should be stamped.  So i stamped her with VersaFine Clair - Nocturne.  Next is creating a ground.  I used some torn paper and made the ground using Distress Oxide Ink Frayed Burlap.  Now i adhered the toadstools.  Next i stamped Fairy Hugs - Frilly Branches and Fairy Hugs Sentiment - Listen. I mixed up some gesso and Distress Oxide Ink - Frayed Burlap to to paint inside of the toadstools.  I also colored in Bryla's wings and her outfit with Prismacolor pencils.  I also added some acrylic hologram paint on top of her wings.

 
Fairy Stamper Store Supplies:


Fairy Hugs Craft Paper - BumbleTwinkle (background paper bottom row - right)

Fairy Hugs Craft Paper - WinkleBush (toadstool paper bottom row 4th from left)


Like us on Facebook
Follow us on Instagram: Fairy Stamper Hugs
Join our NEW Fairy Stamper Hugs Facebook Group here

 Don't forget to include #fairystamperhugs on your projects and tag us at @FairyStamperHugs so we can be sure to see and comment on your projects!

Sign up to receive Fairy Stamper Newsletters at the Fairy Stamper store.

Monday, June 27, 2022

Fairy Hugs Enchanted Dies - Forest Vines and Nightglow Toadstool

 Hello everyone and Happy Monday! 


Let's see what we can make using Fairy Hugs Store supplies! 

I am using Fairy Hugs Enchanted Dies!! 

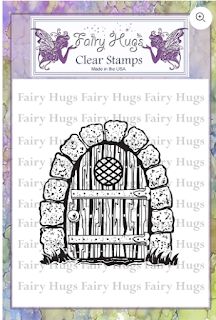
For this card, i started out with the NEW Fairy Hugs Craft Papers - ShimmerGust.  Next i figured out where i wanted to place everything by cutting out the Fairy Hugs Enchanted Die - Forest Vines and Nightglow Toadstool in black.  Then i positioned the acetate photo of the stamps where i wanted the stamps to go and i stamped those in VersaFine Clair Ink - Nocturne.  I colored in the Fairy Hugs - Gnome Door with Prismacolor pencils.  So now i can adhere the dies with glue and place the the the scene on a card base.  I added a few sparkly gems to the toadstools to give the look of  a "night glow". 

Fairy Hugs Store Supplies:


Like us on Facebook
Follow us on Instagram: Fairy Hugs Store
 Join our Fairy Hugs Facebook Group here

 Don't forget to include #FairyHugsStore on your projects and tag us at @FairyHugstore so we can be sure to see and comment on your projects!

Sign up to receive Fairy Hugs Newsletters at the Fairy Hugs store.

 
Thanks for stopping by!

Tutti Designs - 737 Heart Frames

Hello!  Let's see what you can create with Tutti Designs today!


For this card i started out with We Are 3 Digital Paper - Darcy's Garden. I used 2 different sheets. One for the background (all over flowers) and another one for one of the inside of the frame. I measured the frame and hand cut a rectangle to fit inside.  I also used a metallic/mirror paper for the second rectangle.  I then cut out Tutti Designs - 737 Heart Frames from cream paper.  Then i adhered the floral rectangle first and then the mirror/metallic rectangle.  I fussy "diecut" the larger hearts (5 of them) and creased them in the middle.  After adhering the frame with foam tape to the card front, i glued the fussy "diecut" hearts by putting a line of glue in on the crease in the back.  Next i cut out the Tutti Designs - 228 Word Set - Happy and Tutti Designs - 229 Word Set - Birthday and glued that down as shown.


I have used:


Be sure to visit Tutti Designs
for LOTS more fabulous dies and
come back again for more Tutti Designs inspiration!

Here are some Tutti Designs quick links:

Also used:

Friday, June 24, 2022

Need a wedding card quickly? Tutti Designs - Heart Clovers Frame to the rescue!

Hello!  Let's see what you can create with Tutti Designs today!


This is a quick card to create all you need is some paper.  The pink paper is We Are 3 Digital Paper - Backgrounds Happen. The cream texture paper is from We Are 3 Digital Paper - Dreamy Creamy.
To save on paper, i cut out the outline die from the center of the pink paper and then layered the cream texture paper between the outline frame die and pink paper i just cut the frame from.  That way it covers up the area i cut out.  The rest is simple.  Cut out your dies and layer them.  The couple in the middle of the hearts was not made for this heart but can be fussy cut to fit.  The love word was die cut from metallic/mirror card. 

I have used:


Be sure to visit Tutti Designs
for LOTS more fabulous dies and
come back again for more Tutti Designs inspiration!

Here are some Tutti Designs quick links:

Also used:


Thursday, June 23, 2022

Fairy Hugs Enchanted Dies - Lantana's Garden - Journal Cover, Mini Album Cover or Card?

Hello everyone and Happy Thursday!! 

I am a DT for Fairy Stamper Hugs!
It is the #1 USA Retailer for Fairy Hugs Stamps
Check out the store here!!


Beautiful Journal, Mini album or card cover! 
How i made this project.  I started out with the NEW Fairy Hugs Enchanted Die called, Lantana's Garden.  I die cut this from a piece of purple paper from Fairy Hugs Craft Papers - WinkleBush.  Next i backed the die with a paper from Fairy Hugs Craft Papers - TangleWhisper. I colored in the die with Prismacolor Pencils and added some gems. Next, i used a piece of paper from Fairy Hugs - BumbleTwinkle and die cut a small circle from the center of the paper (knowing that i would hide the cut out hole left in the paper with the top layer. Then i stamped Fairy Hugs - Frilly Branches throughout the rest of the paper as shown. I stamped the Fairy Hugs Sentiment - Listen in the center of the circle and added the tips of the Fairy Hugs - Frilly Branches stamp. I distressed the circle sentiment and the background stamped paper.  I layered up everything keeping a 3/4" border for my ribbon closure.  For the ribbon closure, i hole punched the side and thread ribbon through each hole both ways. 

Fairy Stamper Store Supplies:
 Don't forget to include #fairystamperhugs on your projects and tag us at @FairyStamperHugs so we can be sure to see and comment on your projects!

Sign up to receive Fairy Stamper Newsletters at the Fairy Stamper store.

Wednesday, June 22, 2022

What's the Buzz? Tutti Designs - Honey Bee Hexagon says "hello"!

Hello!  Let's see what you can create with Tutti Designs today!

For this card i started out with some We Are 3 Digital Paper - Background Textures. 
Next i cut out Tutti Designs - 746 Honey Bee Hexagon in black card stock.  I also cut out sections from some watercolor paper to create the flower arrangement and random hexagons. For the bee, i painted the wings and the paper under the wings with an acrylic hologram paint and i added some opaque black facetted gems. I used the same gems to the random hexagons outside of the die. I had used the word "hello" on another card and kept the negative part and made it into a tag.

I have used:


Be sure to visit Tutti Designs
for LOTS more fabulous dies and
come back again for more Tutti Designs inspiration!

Here are some Tutti Designs quick links:

Also used:

Monday, June 20, 2022

Tutti Designs - 732 Hedgehog says "hello"

Hello!  Let's see what you can create with Tutti Designs today!


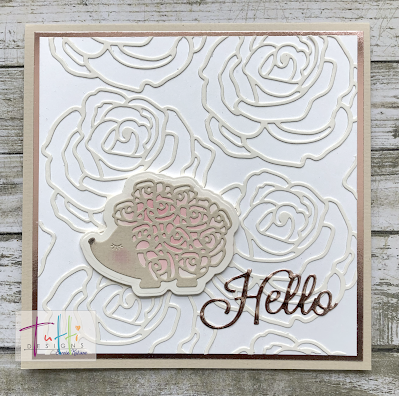
One of my favorite cards! I started with a plain white card stock background and cut out Tutti Designs - 421 Delicate Rose 4 times out of an ivory card stock.  i used several cut off pieces from one or two flowers instead of making a 5 die cut. I then put the cut outs on top of the white card stock.
Next i die cut Fairy Hugs - 732 Hedgehog out of a tan paper and added some ink for her cheeks and i colored in the tip of the nose with a black colored pencil.
I cut out the outline die from a lighter tan and ink blended the section that would be behind the roses in the hedgehog. I attached the hedgehog to the rose base allowing enough room for the larger Tutti Designs - Word Hello which i cut out of mirrored/metallic paper.  

I have used:


Be sure to visit Tutti Designs
for LOTS more fabulous dies and
come back again for more Tutti Designs inspiration!

Here are some Tutti Designs quick links: